Thinkific Review (Apr, 2026): How To Create & Sell an Online Course
by Abhigyan
So, you have decided to share your knowledge and create an online course but need some ideas on how to start? You’ve come to the right place.
I’ll show you how easy is to create and sell an online course using Thinkific.
You can use Thinkific’s online course platform to grow your business with education, just like tens of thousands of independent experts, creators, entrepreneurs, authors, speakers, trainers, coaches, nonprofits, technology companies, and educators already do.
Using Thinkific, you can build your own training website where you can create, market, sell, and deliver online courses to your audience.
Thinkific’s suite of tools is designed at every step to help you deliver tangible results to your students so, that you can create a sustainable business.
Before diving into the tutorial, let’s take a look at how Thinkific stands out among the plethora of online course platforms out there.
Disclosure: Some of the links I share might be affiliate links. If you click on one and make a purchase, I may earn a small commission as a thank you. But don’t worry, it won’t cost you anything extra. I only recommend stuff I genuinely believe in. Your support helps me keep creating awesome content. You can read my full affiliate disclosure in my disclaimer page.
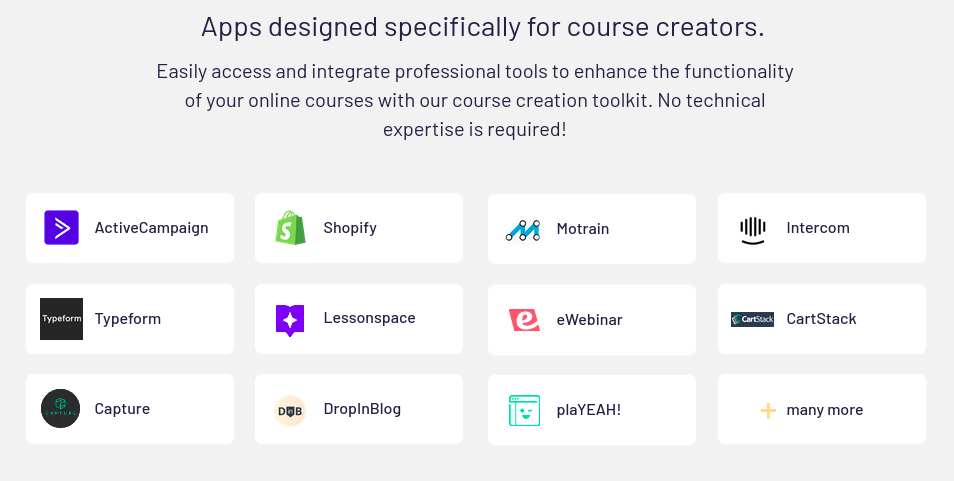
Thinkific has launched their App Store using which course creators will be able to fully customize their courses and other learning products, market their businesses, and simplify their processes.
You might have experience using other app stores like Google Play Store or Apple App Store. The apps in those stores are not created by Google and Apple itself.
Similarly, the apps in the Thinkific app store are 3rd party integrations that will help take your education business to new levels.
As a course creator, you might want to integrate Zoom to interact with your students.
Or you want to create a membership site and want to integrate Convertkit to your Thinkific account. Now, you can do this with just a simple click.
Since these are integrations, you don’t need to write any code or hire a web developer to do it for you.
Just click “Install” on any app to add its features to your Thinkific account.
Every course creator is unique and based on your learning and business strategies, you’ll benefit a lot by using these 3rd party integrations.
For instance, the Hello Audio app is a great option to convert your digital content in Thinkific into a private podcast feed that your learners can listen to on the go.
You can use the Motrainapp to attract learners to your courses and to motivate course completion.
Motrain enables your learners to earn “virtual coins” for completing lessons and courses which can be used to purchase items in your own personalised rewards store.
You can also boost your marketing strategy by using apps like Poptin and eWebinar.
Poptin provides a way to create pop-ups and forms and add them to your Thinkific site in minutes.
With eWebinar, you can easily turn any video into an automated Webinar to sell your courses. You can find more marketing apps and e-mail service providers in the App store.
As a course creator, you need better insights and data to determine what products to create and to understand whether your students are using them or not.
You can use some of the apps present in the Thinkific app store like Mixpanel, which is an advanced analytics platform for mobile and web.
It will help you analyze the actions students are taking within your Thinkific site.
You can also add your Google Analytics Tracking ID to your Thinkific account so that you can better understand learner behavior.
Apps like Segment.io lets you send Thinkific data in real-time to over 100 analytics, marketing, support systems, and applications like HubSpot, Salesforce, Optimizely, etc.
If you want to know more about Thinkific’s app store and integrations, you can visit the Thinkific help center and browse articles on app integrations.
How Much Does Thinkific Cost?
You might be thinking about which Thinkific plan is right for you. I’ll go over what each Thinkific pricing plan has to offer so that you can choose the best plan for your business.
All the plans give you the ability to host multiple content types including videos, images, etc. You can build a website for your business and create quizzes for your course.
You can accept payments via Stripe and PayPal, and you get access to their in-course discussion tool. Moreover, Thinkific doesn’t charge a transaction fee on any of the plans.
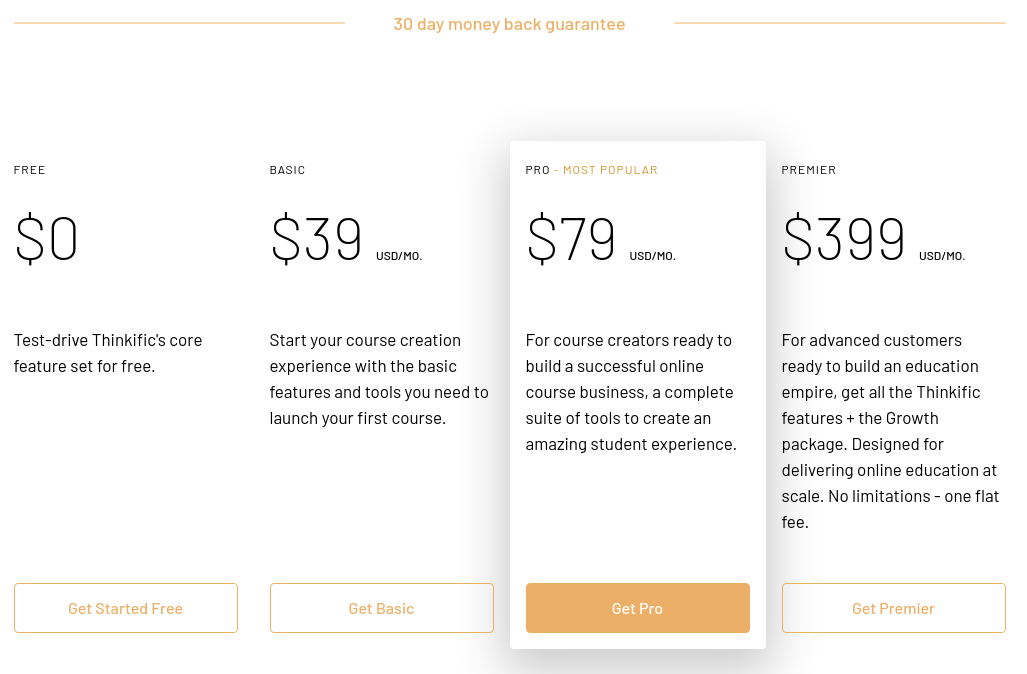
What Does Thinkific Free Plan Include?
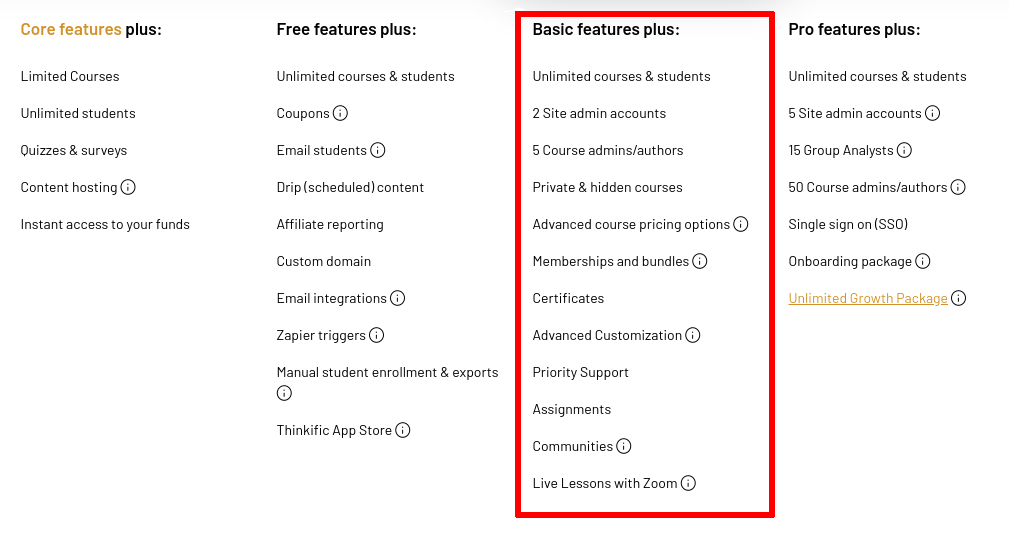
With the Free Plan, you will get the most basic course creation features. You can host your content, deliver it professionally and have an unlimited number of students enrolled in your school even though you can create only one course.
In the tutorial below, you can see how you can create your school and a course using just the Free Plan.
Thinkific’s Basic plan costs $49/month, and it enables you to create an unlimited number of courses. Furthermore, you can use a custom domain for your school/course name.
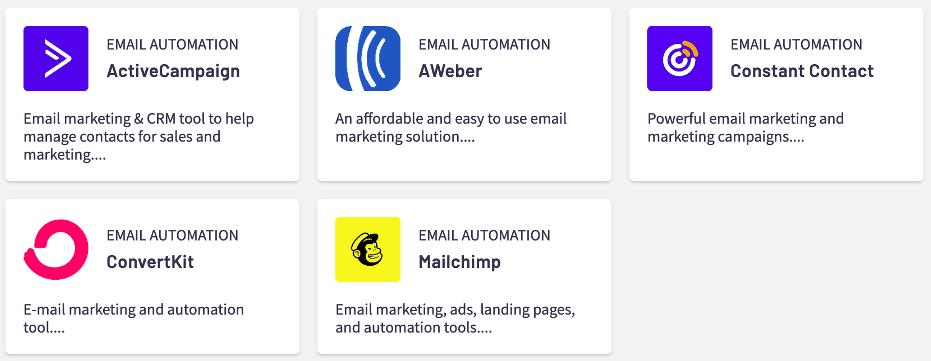
You can also integrate with various email marketing programs like ConvertKit, Aweber, MailChimp, etc. via the Thinkific apps available in the app store.
The most popular Thinkific’s plan among creators is the Pro plan. It costs $99/month and gives a lot of essential features like subscription pricing and bundles which are must-haves if you’re planning to create any sort of a membership site.
A lot of creators require features like community, certificates, content locking, assignments, randomized question banks, live lessons with Zoom, etc. which are included in the Pro plan.
If you are a website designer, the Pro plan gives you access to modify the HTML/CSS of the website theme. Additionally, you can add 2 site admins accounts and up to 5 course admins.
Thinkific’s premier plan costs $499/month and it offers bulk emailing, white-labeling, Groups, advanced integrations, and single sign-on.
Furthermore, you can integrate with advanced sales and marketing tools like Infusionsoft and an exam solution called Brillium.
You can have up to 5 site admins and 50 course admins which is useful if you want multiple instructors to have access to your school.
How To Create A Course Using Thinkific
In this tutorial, I’ll show you how you can start your online school and create a course.
Just follow the steps below and you’ll become a pro at creating courses on Thinkific in no time.
Step 1: Create A Free Thinkific Account
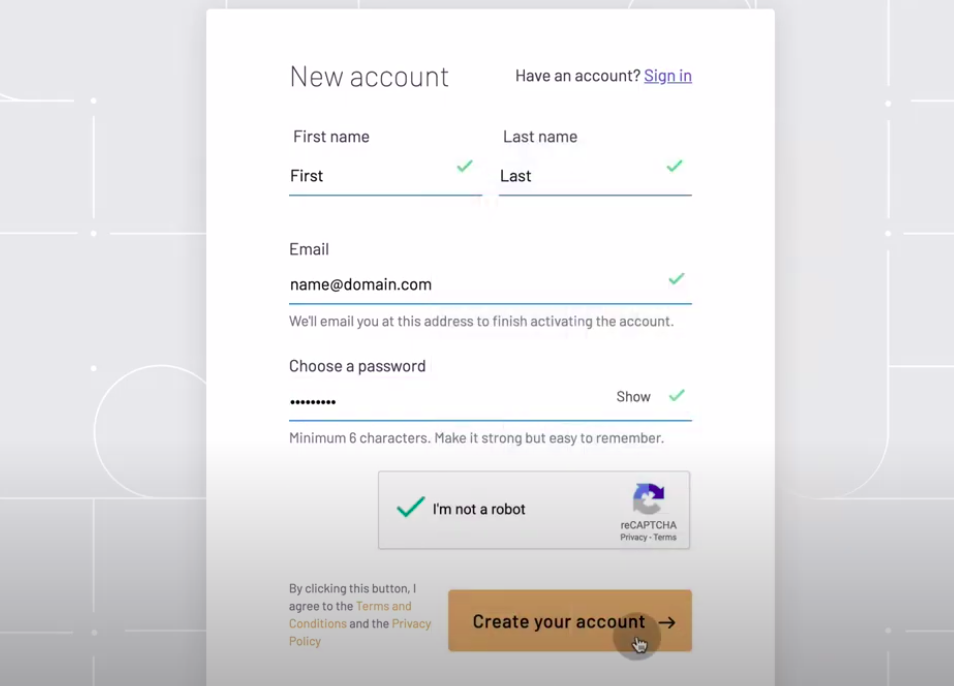
Go to thinkific.com and click on the ‘GET STARTED FREE’ button at the top-right.
It is a pretty straightforward process. Enter your first name, last name, email, and password. Then verify the captcha and click the button ‘Create your account ->’.
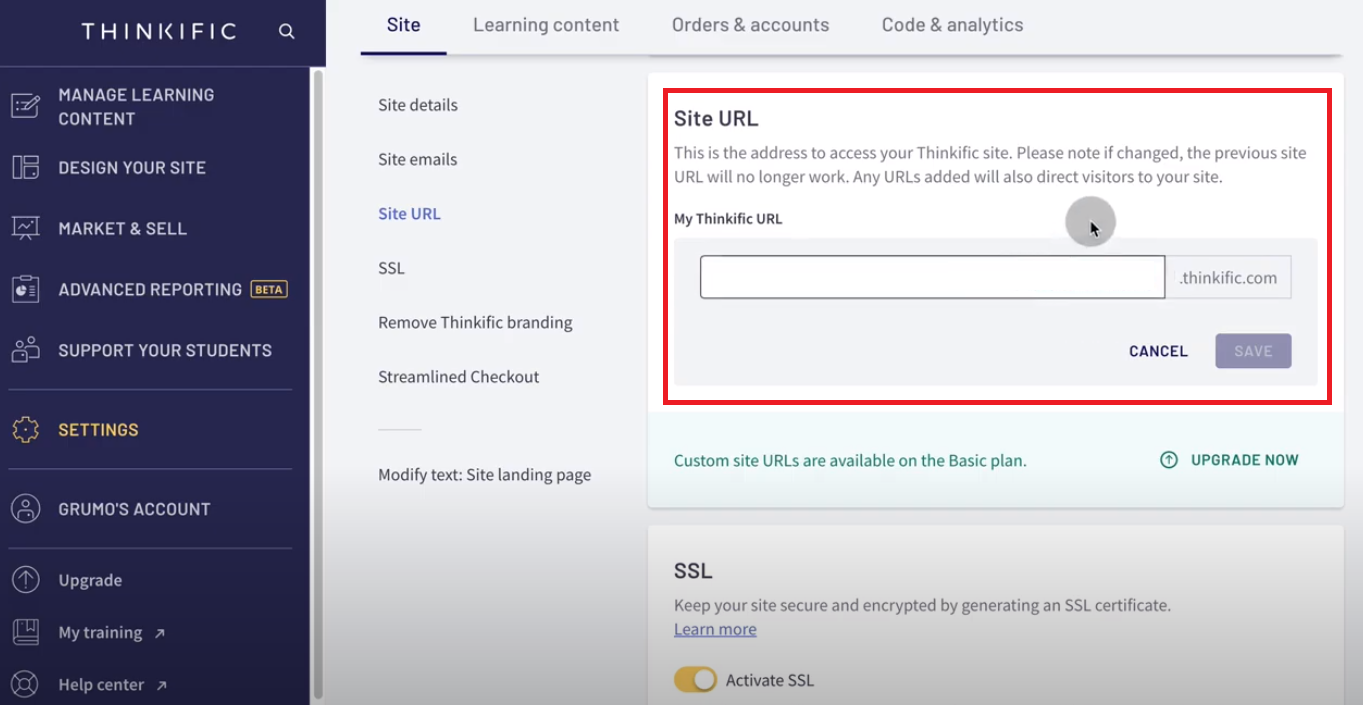
Under the ‘Site URL’ tab, you’ll get the option to edit your school URL. You can choose any name you want, but make sure it is relevant to your school name.
In order to customize the whole link and get rid of .thinkific.com and use a custom URL, you need an upgraded plan.
For this tutorial, since we’re using a free plan, we’ll leave it as it is.
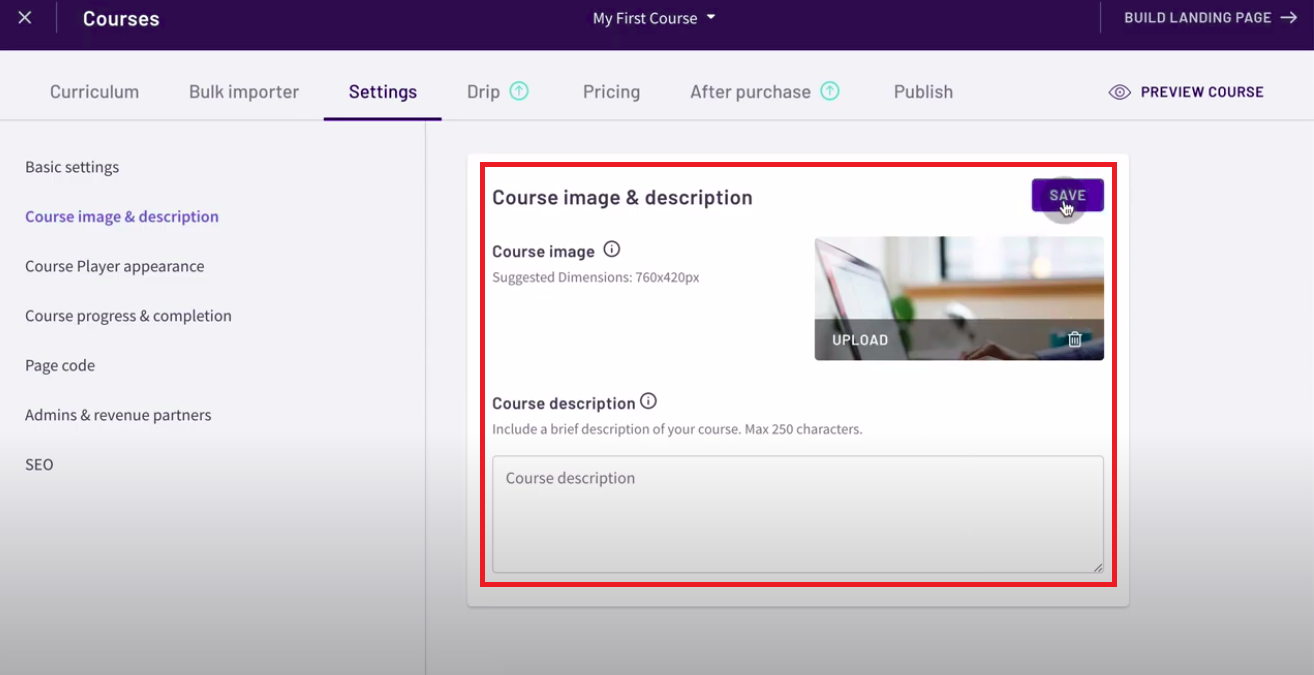
If you have a paid account, you can upload your own logo. For this, navigate to the ‘Branding’ tab on the left side and click on ‘UPLOAD’ under the ‘Logo’ block.
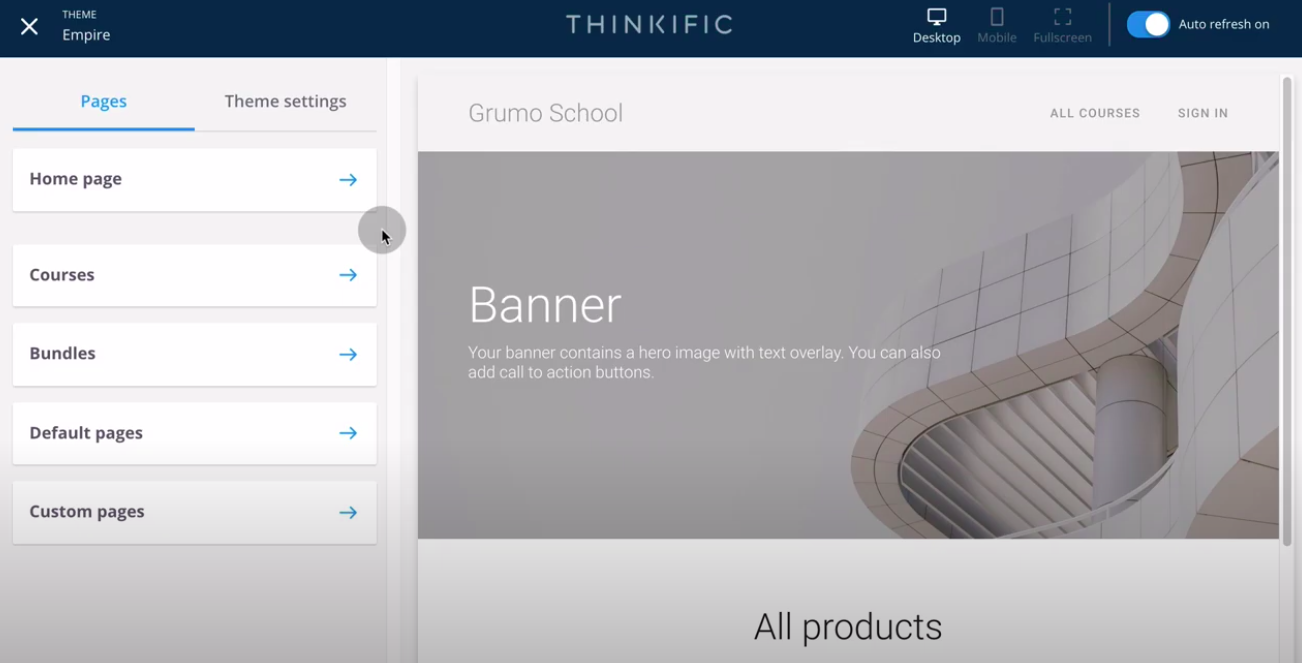
For example, if you want to change the banner of your school, click on the ‘Home page’ button under ‘Pages’. Then click on the ‘Banner’ tab and then click on ‘Hero image’.
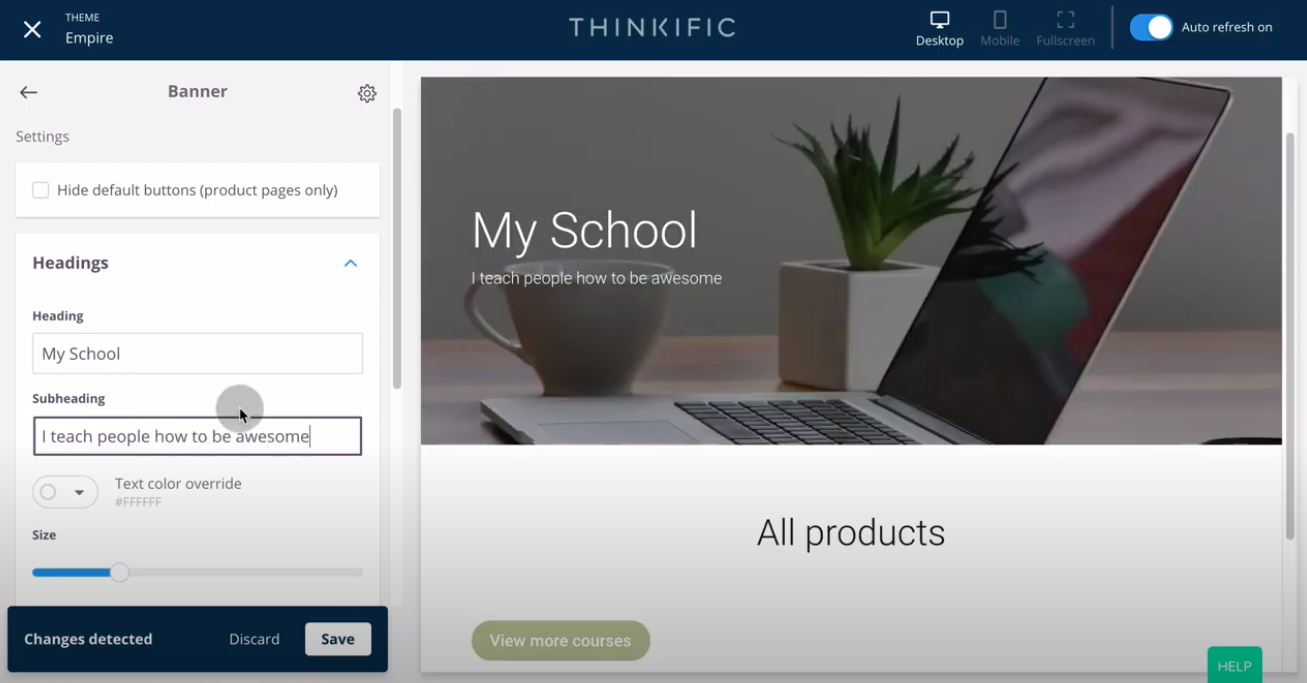
You’ll see a dropdown where you can select the image that you would like to be your school’s banner. If you hover over the image, you will see an option to upload your image.
You can use free images from sites like pexels.com and unsplash.com. You can also create your own free banners at free sites like Canva.
Alternatively, if you want to have a more professional look, you can always hire a freelancer from sites like Fiverr to create your banners and logos.
Make sure you click ‘SAVE’ every time you make any changes to your design.
You can also change the heading and description of your school under the ‘Headings’ options. You can customize the color as well as the font-size of the elements.
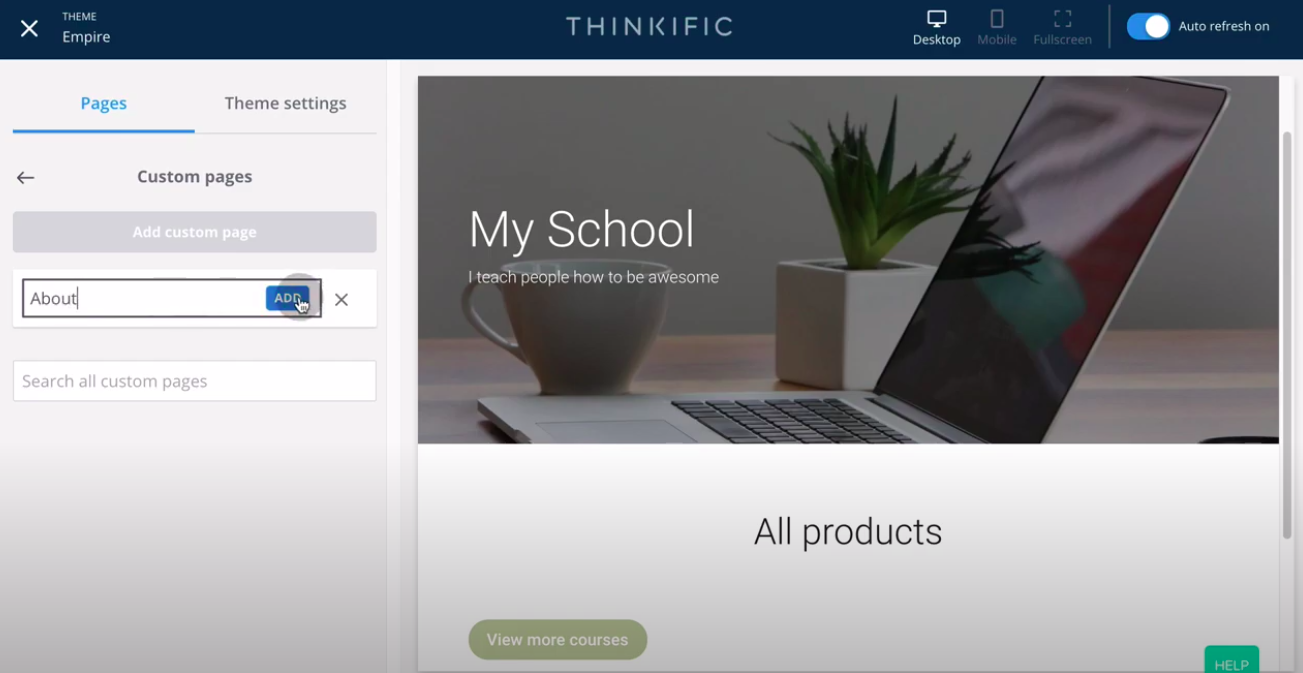
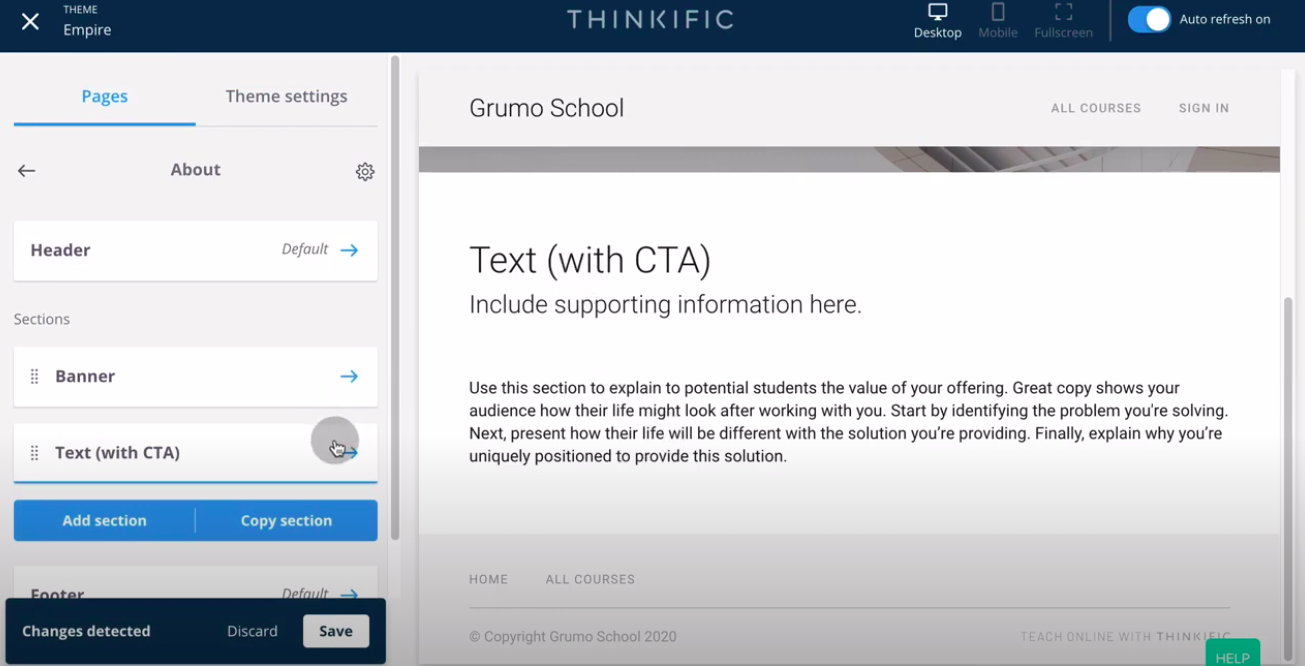
Let’s select the ‘Text (with CTA)’ option under section types. You can edit the default values here as well by clicking on the ‘Text (with CTA) ->’ button and going over to the ‘Text’ option.
Then we can change the ‘Heading’ to ‘About’ and give a brief description about school and then click the ‘SAVE’ button.
There are many section types that you can add to your site. I would advise you to spend some time getting familiar with these various options.
You can add buttons, testimonials, testimonials, pricing details, countdown timer, and a lot of other features to your site.
These features will come in handy while creating a landing page for your site.
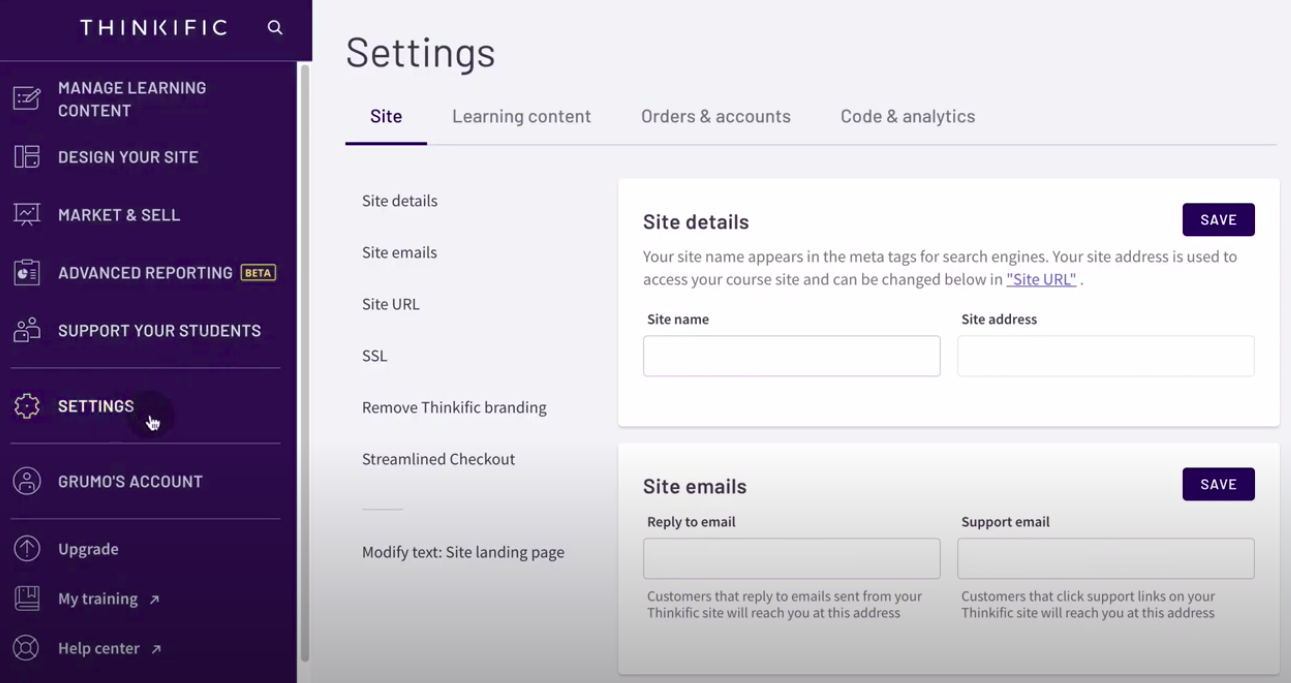
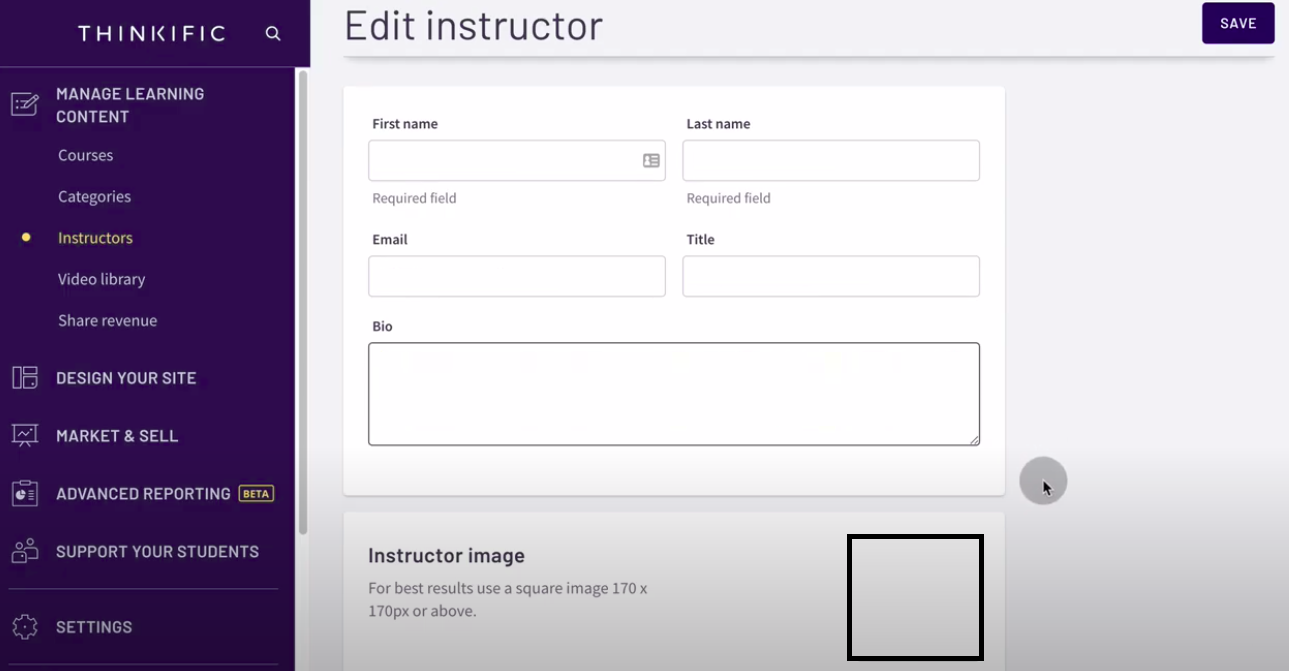
Go to ‘MANAGE LEARNING CONTENT’ on the left side and click on the ‘Instructors’ tab. Here you’ll see the instructor’s name, email, and title. Click on the ‘EDIT’ button.
Here, you edit the instructor’s name, email, title, and bio. You can upload your instructor’s photo as well, and it is recommended to do so to get better engagement results.
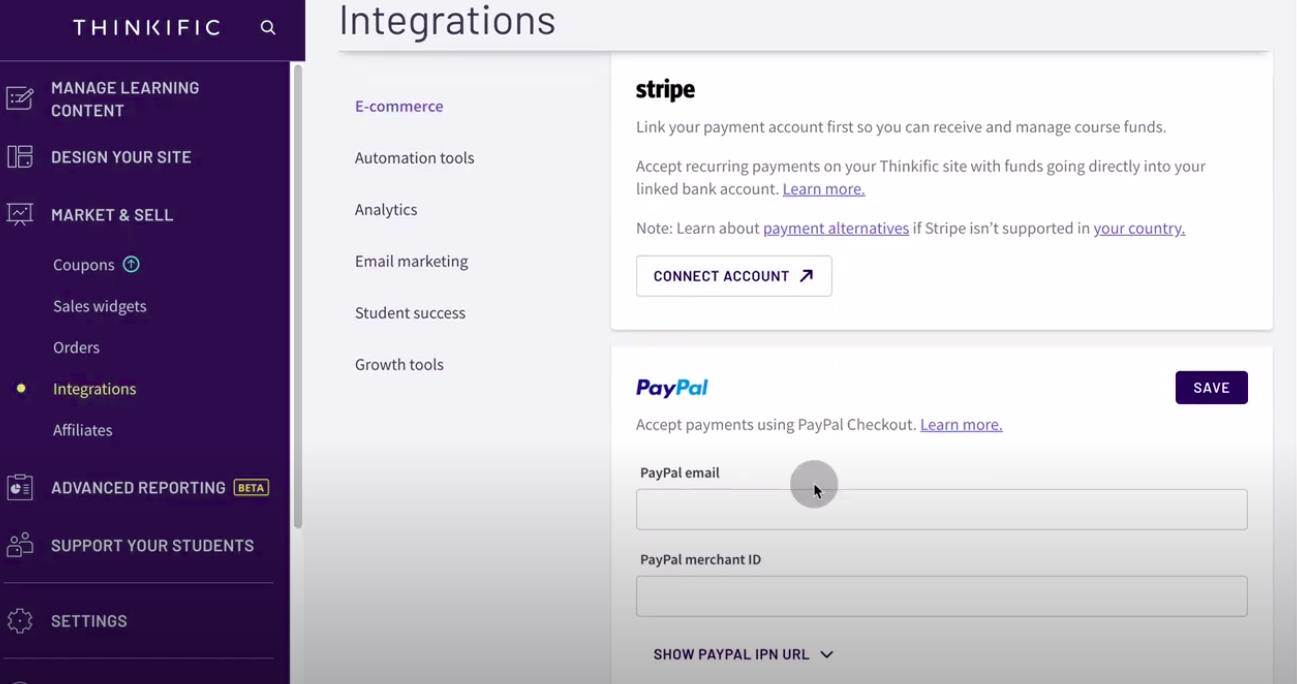
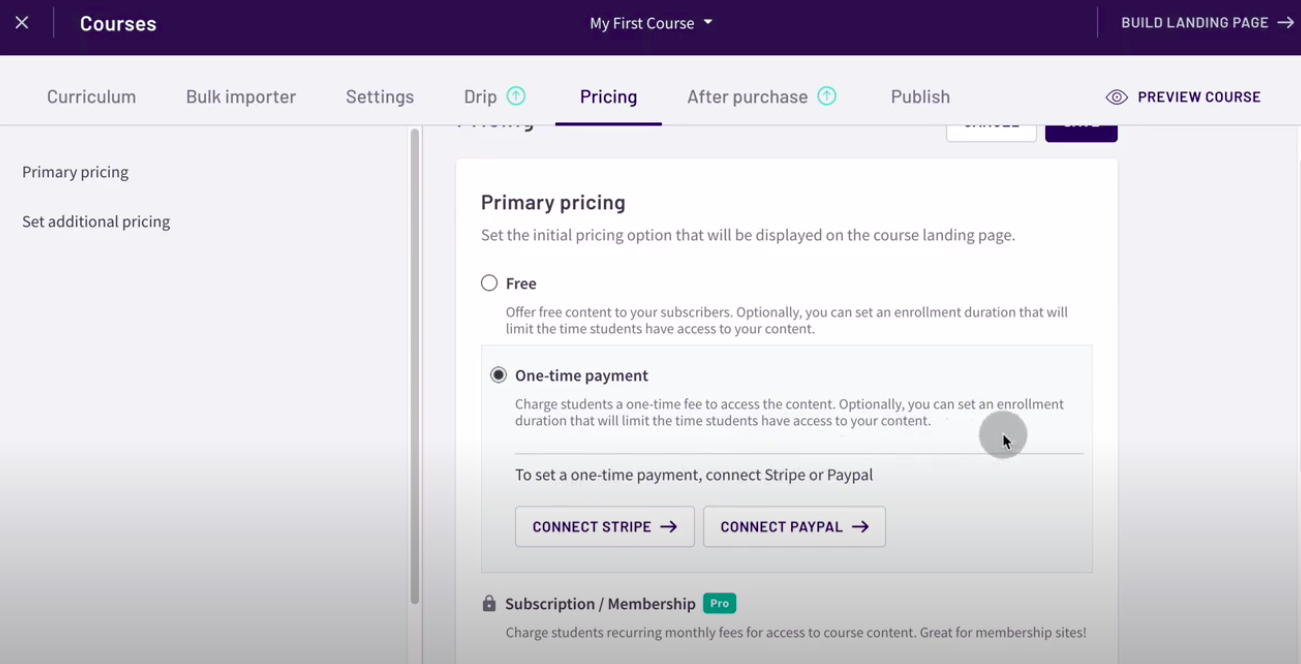
To start collecting payments, you need to enter your payment details. Right now, Thinkific offers Stripe and Paypal integration.
Head over to the ‘MARKET & SELL’ tab on the left side and click on the ‘Integrations’ tab. Here you can choose to connect your Stripe account or you can enter your Paypal email id.
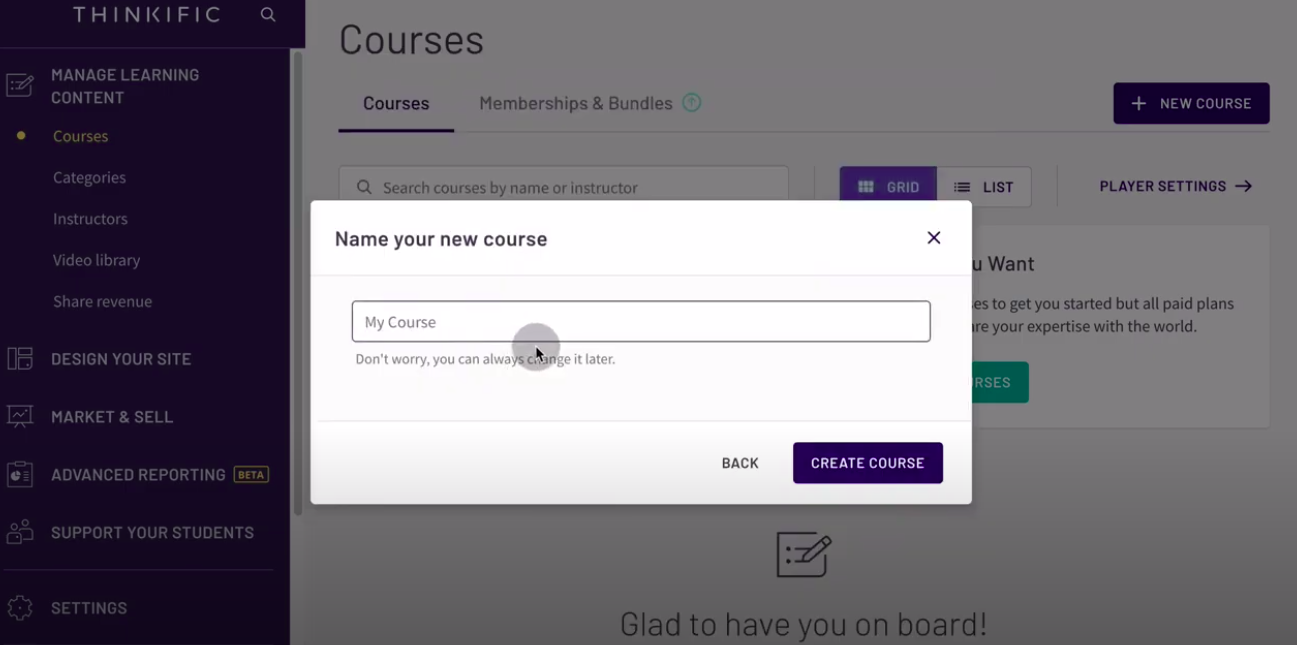
Click on the ‘SAVE’ button and you are done with setting up your school. Now we’ll create a course for our school.
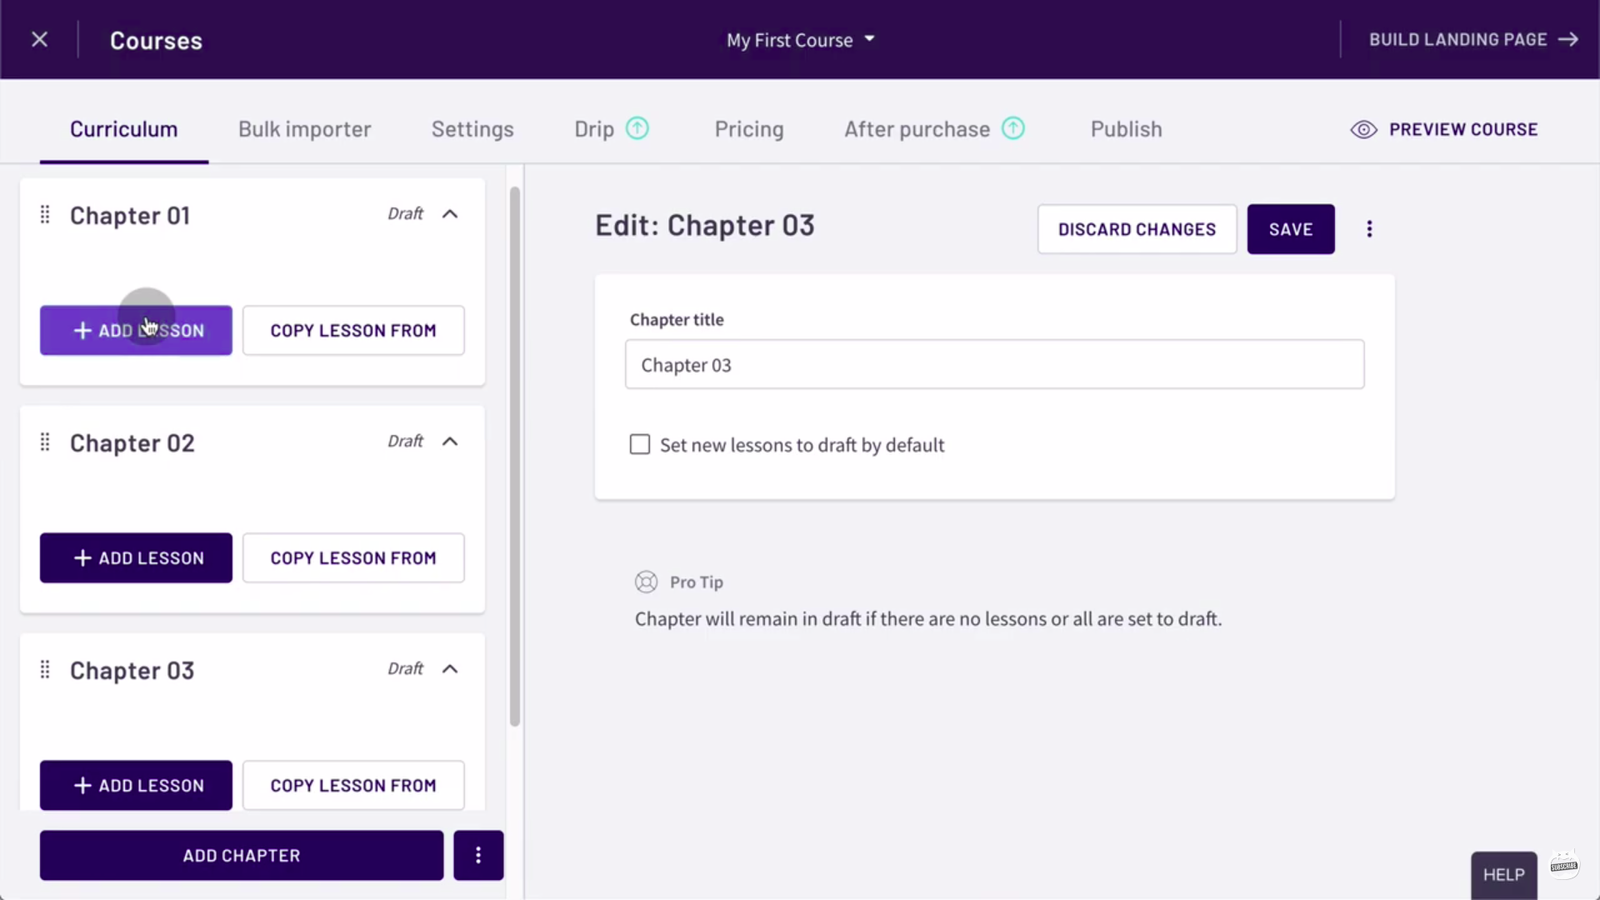
On the bottom-left, you will see the ‘ADD CHAPTER’ button. Click on this to create chapters for your course. Now you can add individual lessons under each chapter.
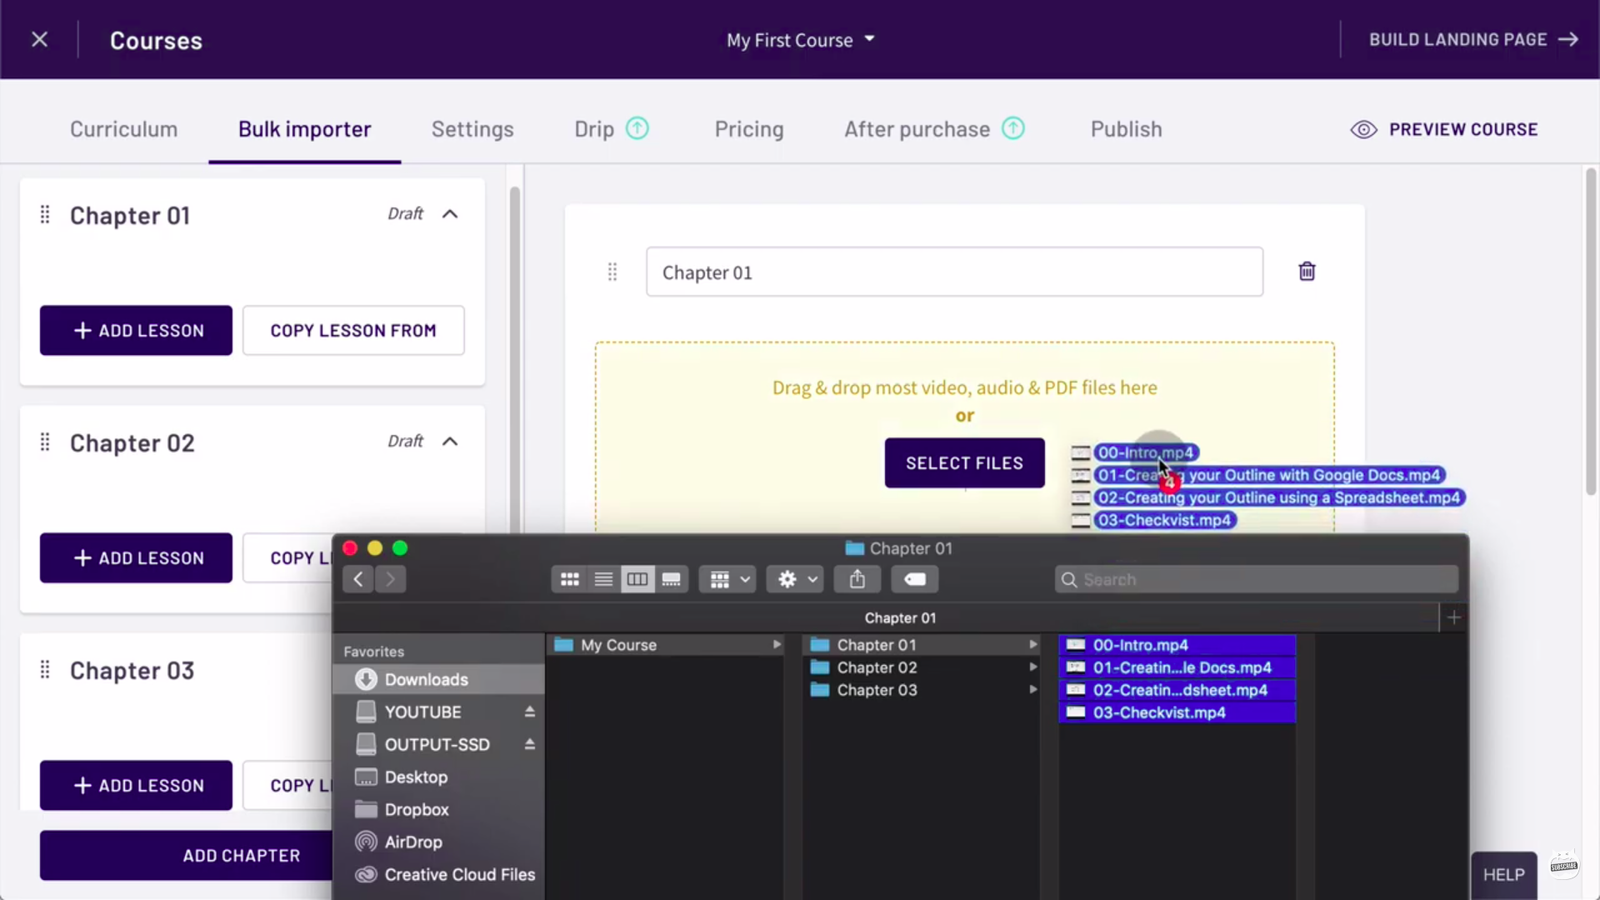
If you have already created the content for your course, you can use the ‘Bulk importer’ option and upload your course content directly under each chapter.
For this tutorial, we are gonna drag-&-drop some videos under the first chapter.
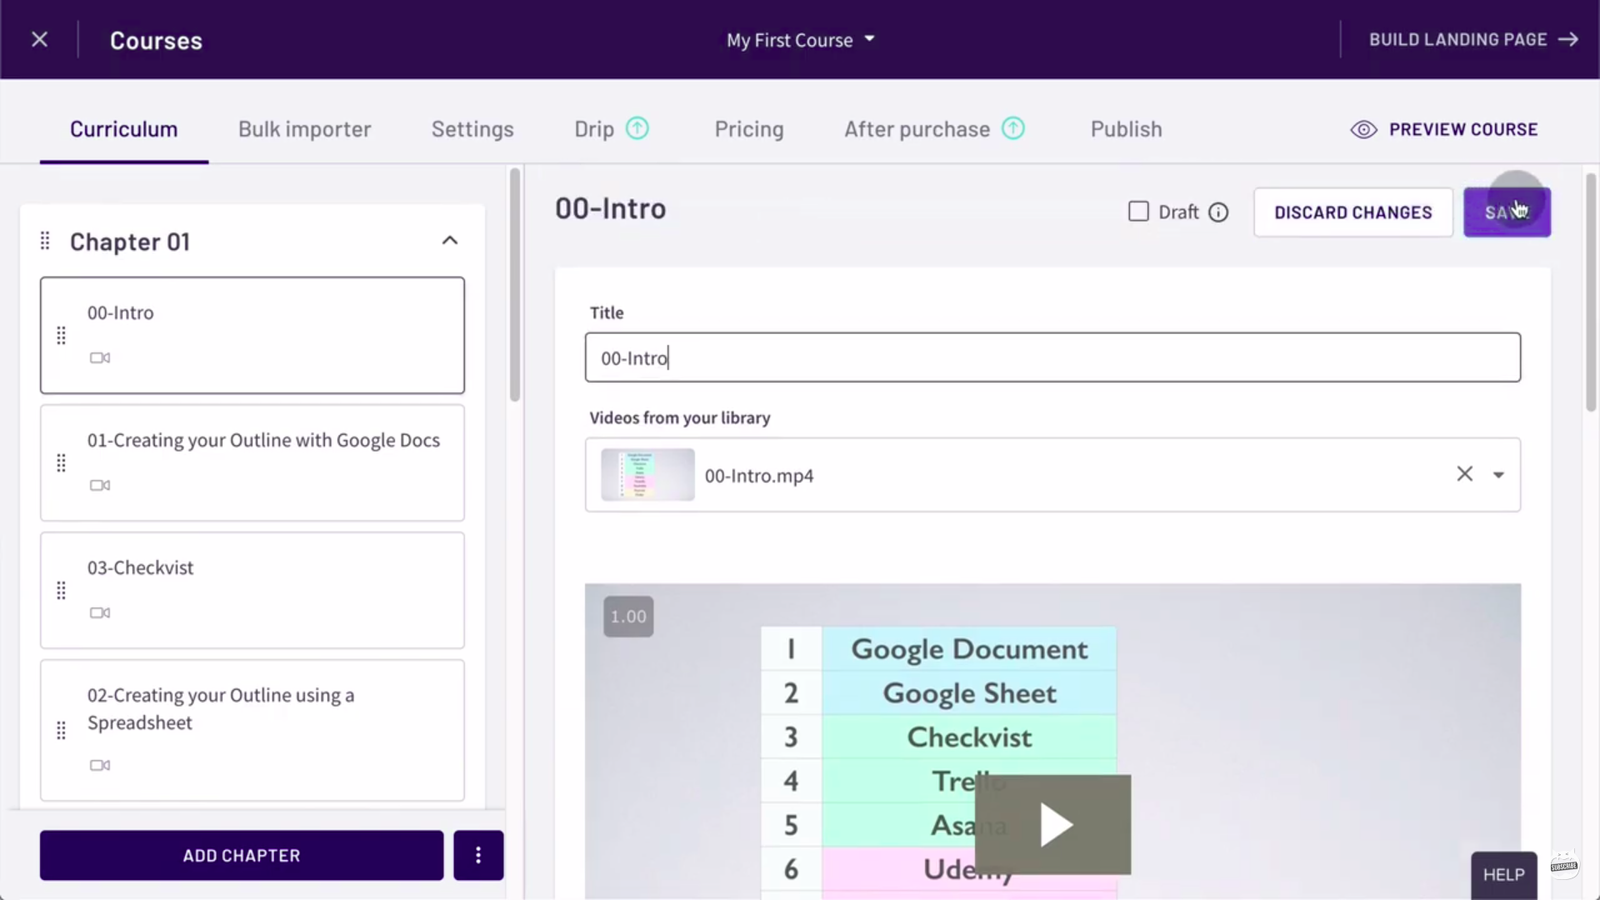
Step 11: Rename Lessons And Add Lesson Description
Once the videos are uploaded, you can change the lesson name at the top to reflect the topic of the lesson. If you scroll down, you’ll see options for adding a lesson description.
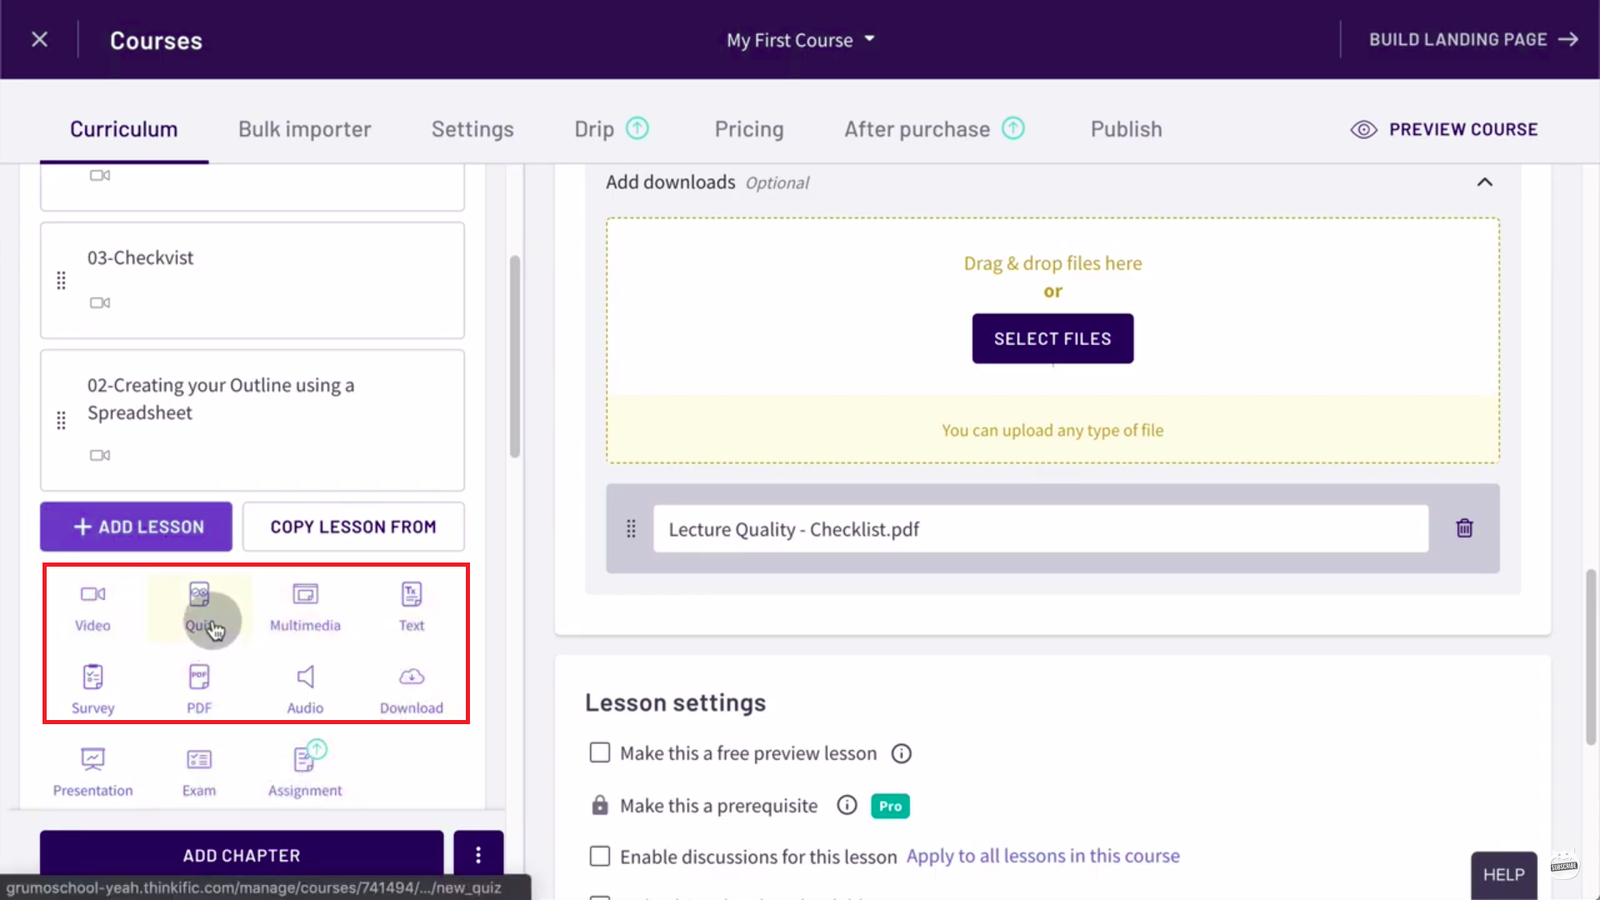
You can also attach downloadable files like a transcript of the lesson or a checklist pdf. You can add as many files as you want. At the top, ‘SAVE’ your changes once you add those files.
There is also an option to create assignments but that option is available only for paid accounts. However, as a free user, you can still create quizzes.
To add a quiz for the lesson, click on the ‘+ ADD LESSON’ button and then choose the ‘Quiz’ option.
Now you can create questions and choose different options for each question, like MCQ. Then you select the correct answer, click ‘SAVE’ and you’re done with the quiz.
Click on the ‘Pricing’ tab to set the price of your course. Here, you can choose whether you want to provide the course for free or for a price.
To set the price, you need to connect your Stripe/Paypal account.
If you have a paid account, you get more options for getting paid. You can create a monthly subscription plan and charge your students recurringly to access course content.
You can also split the full course price over several monthly payments.
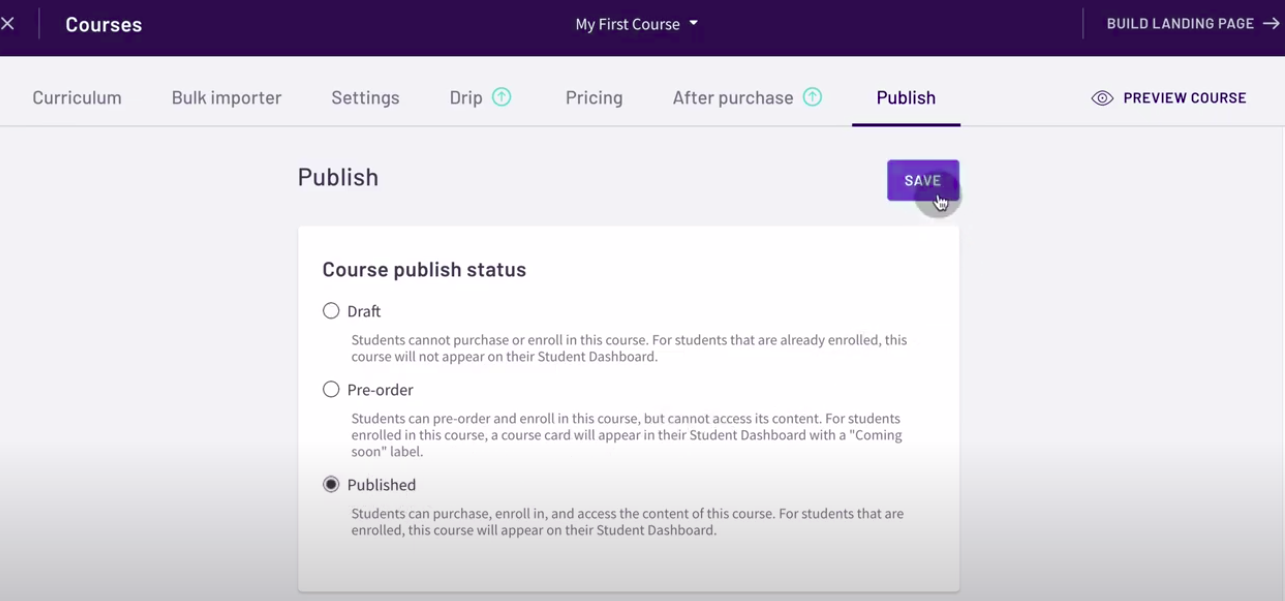
Finally, head over to the ‘Publish’ tab and select the ‘Published’ option, and then click on the ‘SAVE’ button. That’s it, you have successfully created a course!
If you want to see how your course looks like, click on the ‘DESIGN YOUR SITE’ tab on the left side and then click on the ‘Preview website’ button.
I highly recommend Thinkific for anyone who wants to make money by creating and selling online courses.
The interface is very intuitive and you don’t have to bother with having your own website and the hosting fees, plugin set, ongoing maintenance, and more.
The free version of Thinkific has all the core features, which is something we rarely see on other online platforms of this type.
The best way to know whether this is the right program for you is to go for a free one-month trial first, and then upgrade your service if you can justify it through your sales.
I hope this article and tutorial gave you an insight into what Thinkific is all about and how easily you can start creating courses on Thinkific.
Do let us know in the comments how was your experience with Thinkific, what you liked about it, and what should be improved to make it better!
Thinkific FAQs
Is Thinkific Safe?
Yes, Thinkific is safe and legit. Thinkific was launched in 2012 by Greg Smith and has the trust of 50,000+ course creators and 270 dedicated employees.
How Long Is Thinkific Free?
Thinkific is free as long as you want it to be free. You only need to pay if you decide to go for extra features that are included in the paid plans.
You can use their one-month free trial to check out all the features offered by Thinkific.
Is Thinkific Mobile Friendly?
Yes, the designs and Thinkific Course Player are fully mobile responsive.
Your students will be able to take your courses on the go from any phone, tablet, or computer. However, they don’t have a dedicated mobile app, yet.
Is Thinkific Cloud Based?
Yes, Thinkific is a cloud-based learning management system (LMS) that lets users create and sell online courses.
Does Thinkific Integrate With WordPress?
Yes, you can use the Thinkific WordPress integration to monetize your existing traffic by adding online courses to your product offerings without having to build a whole new site.
Does Thinkific Charge Transaction Fees?
No, Thinkific does not charge any transaction fees, even on their free plan.
Do I Need A Credit Card To Start A Thinkific Trial?
No, you don’t need to enter your credit card (or debit card) details in order to create a free account on Thinkific.
However, if you sign up for a free trial of one of the paid plans, then you need to enter your credit card details.
Does Thinkific Have A Money Back Guarantee?
Yes, Thinkific has a 30-day money-back guarantee wherein you can get a refund within 30 days of your payment.
Are Thinkific Apps Free?
Yes and no. The app integrations are free. But you need a paid account to make use of the integrated third-party software.
Thinkific’s one-month free trial lets you try them for free for a month.
Hi! I’m Abhigyan, a remote web developer and an affiliate blogger. I create beginner-friendly guides to help new affiliates get started and grow in affiliate marketing. I also share information on remote companies and interview preparation tips.
This website uses cookies to improve your experience while you navigate through the website. Out of these cookies, the cookies that are categorized as necessary are stored on your browser as they are essential for the working of basic functionalities of the website. We also use third-party cookies that help us analyze and understand how you use this website. These cookies will be stored in your browser only with your consent. You also have the option to opt-out of these cookies. But opting out of some of these cookies may have an effect on your browsing experience.
Necessary cookies are absolutely essential for the website to function properly. This category only includes cookies that ensures basic functionalities and security features of the website. These cookies do not store any personal information.
Any cookies that may not be particularly necessary for the website to function and is used specifically to collect user personal data via analytics, ads, other embedded contents are termed as non-necessary cookies. It is mandatory to procure user consent prior to running these cookies on your website.