How To Get Approved For The Target Affiliate Program (8 Steps)
Target is the red bullseye store that half of America visits every week. If your blog covers home, parenting, style, or budget life, you probably want a link that earns when your readers shop there.
The Target affiliate program is open to bloggers, but it does not say yes to everyone. Reviewers look at your site, your audience, and how you plan to promote before they decide.
The eight steps below cover eligibility, site prep, the network sign-up, the application, rejection causes, commissions, links, and payments. A worked example, a mistakes section, and an FAQ follow.
Rates and terms change often, and most public guides come from third parties. Treat every number here as a starting point, and confirm the details inside your network account first.
Disclosure: Some of the links I share might be affiliate links. If you click on one and make a purchase, I may earn a small commission as a thank you. But don’t worry, it won’t cost you anything extra. I only recommend stuff I genuinely believe in. Your support helps me keep creating awesome content. You can read my full affiliate disclosure in my disclaimer page.
If you want to save a lot of hours searching for high-paying affiliate programs, check out our exclusive list of 2500+ affiliate programs. You’ll find all the information about the programs inside the list. This list is perfect for affiliate bloggers and influencers.
Why Bloggers Want Into The Target Affiliate Program
Target has a brand that readers trust. A shopper who already loves the store does not need much convincing to click a link.
The catalog covers home decor, baby gear, clothing, beauty, and a lot more. That range lets a general lifestyle blog link to a throw pillow, a stroller, and a sweater from the same site.
Target runs its affiliate program through a network called Impact. You create an account there, apply to the Target program, and wait for a decision.
Published guides call the program Target Partners, and they say applications are reviewed by hand. Approval is not guaranteed, and a small or brand new site is less likely to get a yes.
The program is free to join. You pay nothing to apply, and you pay nothing to keep an account.
Guides also report that approved members can deep link to almost any product on Target.com. They get banners and creative assets for building promotions too.
The catch is the pay. Published rates run from 1% to 8%, and the cookie window is 7 days, which is short compared with many software programs.
Several big categories pay nothing at all. Groceries, electronics, toys, pet care, and a few others sit at 0% in the guides, so plan your content around the categories that pay.
Target Partners is also different from Club Target, a points based program for social creators that launched in 2026. The article you are reading covers the affiliate program for website owners.
Our guide on how to get approved for affiliate programs covers the general rules that apply to every application. Target has its own quirks, and the sections below walk through them.
If you also plan to apply to the biggest competitor, read our page on how to get approved for the Walmart affiliate program. The two programs share a network, and the prep work overlaps.
Home improvement bloggers can read how to get approved for the Home Depot affiliate program as well. Many sites apply to several retailers at once.
Keep one goal in mind as you read. You want a clean site, an honest application, and a plan for the day you get approved.
Think about the posts that fit. Dorm room checklists, nursery guides, gift lists, and small apartment makeovers all send readers straight to a product page.
Seasonal traffic helps as well. A site with back-to-school and holiday posts can see clicks jump when shoppers start planning.
Step 1: Check Eligibility And Read The Terms
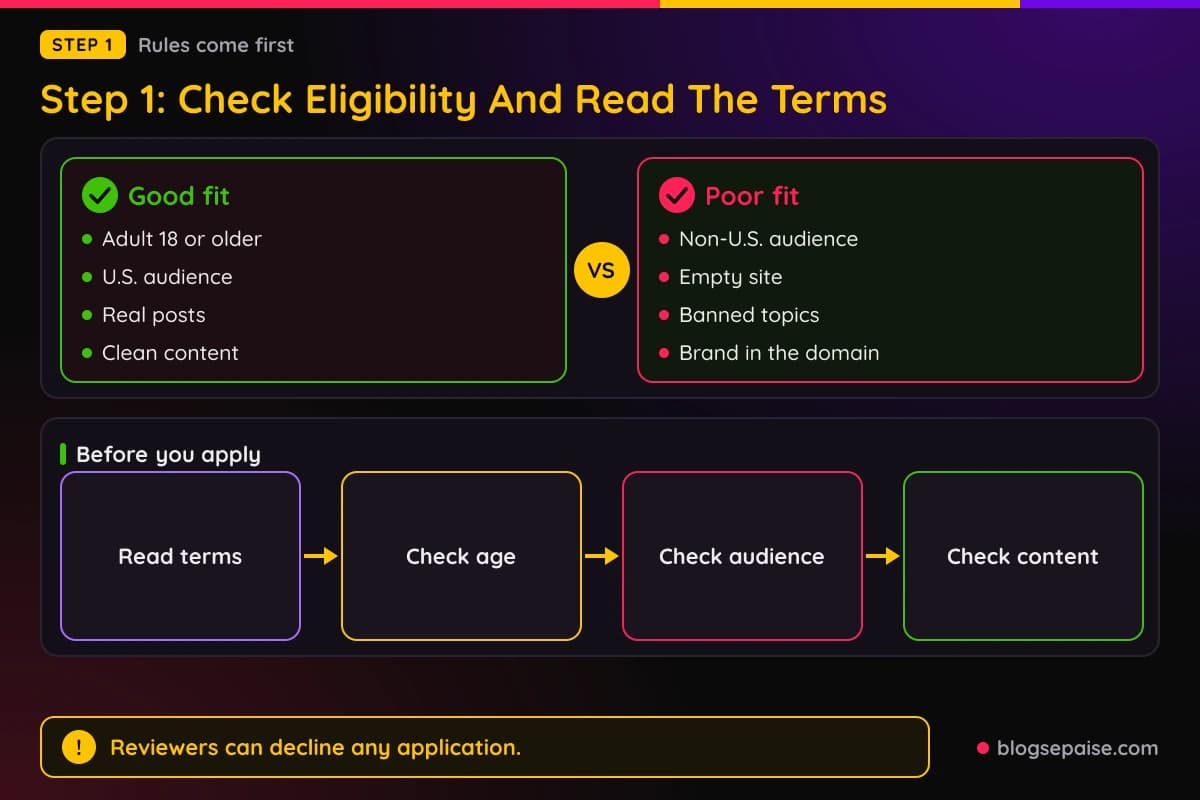
Start with the rules, because they decide if an application is worth sending. Target posts its program terms inside the network, and you should read them before you do anything else.
First, you need a real audience in the United States. Guides say only sales from U.S. visitors are tracked and credited, so a blog written for readers in another country is a poor fit.
Second, you should be an adult. Most affiliate networks require applicants to be of legal age where they live, which is at least 18 in most states.
Third, the program is built for publishers. Published guides say it is open to bloggers, website owners, and content creators who can show where they plan to promote.
The program does not publish a minimum traffic number. Guides add that reviewers favor sites with an established, relevant audience, so a site with no posts will look weak.
Fourth, the content has to be a fit for a family friendly retailer. Adult material, hate, gambling, and illegal topics are the kind of content most big retail programs reject.
Target can accept or decline any application. That is why even a good site can get a no, and why you should not take one personally.
Do not link to Target before you are approved. Keep that in mind if you have drafts with unofficial links in them.
Read the whole agreement once, slowly. Our guide on how to read affiliate program terms shows which clauses matter most.
Write down the rules that apply to you in a short note. A one page summary is easier to check against your site than a long legal document.
Terms change over time. A quick reread before each major update to your site is a smart habit.
If a clause confuses you, ask network support a simple question. A clear answer before you apply beats a guess that costs you the account.
Check your tax situation too. The network asks for tax details, and the rules differ by country and by how you earn, so ask a tax professional when you are unsure.
Finally, decide if a coupon or deal site is really what you run. Retail programs often treat those sites differently, so read the section on promotion rules before you apply.
Step 2: Prepare Your Site Before You Apply
Next, get your site ready for a stranger to review. A reviewer will open your link, look around for a minute, and decide.
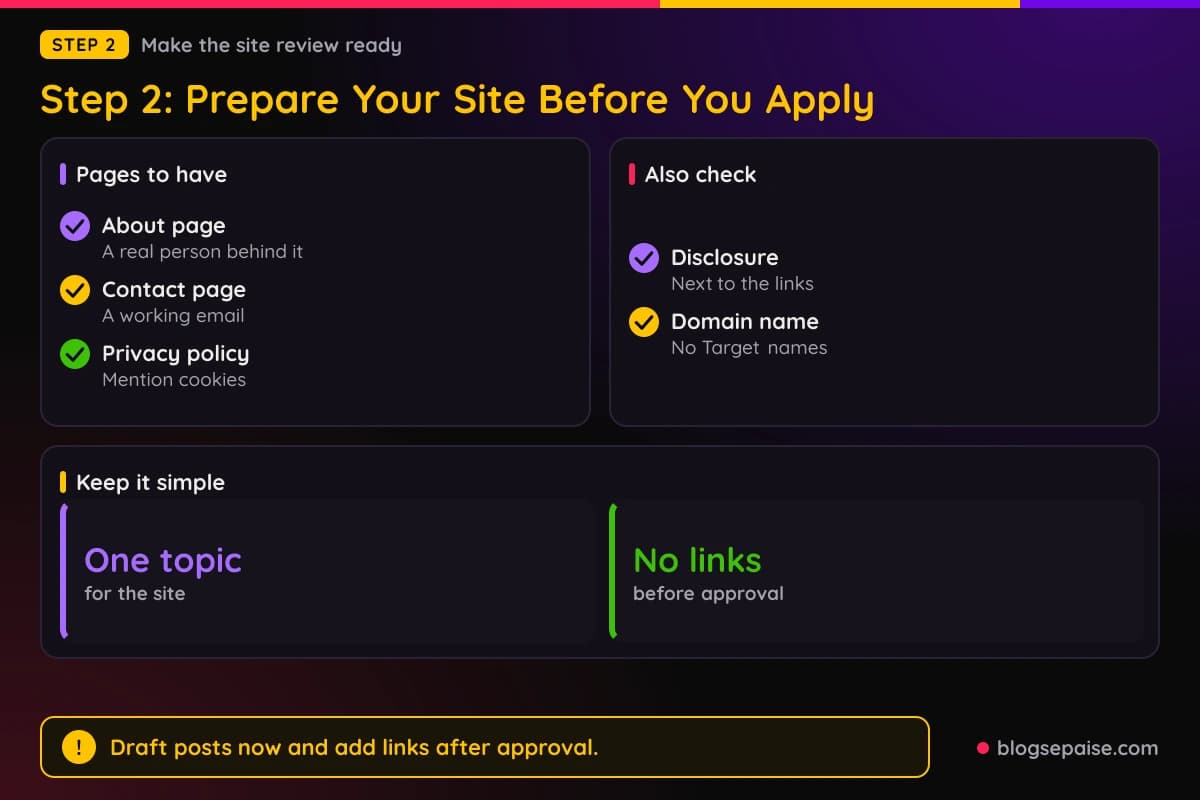
Pick one clear topic. A blog about nursery ideas, small apartments, or budget style tells a reviewer what your readers want.
Publish real posts first. Fifteen to twenty useful articles look better than three thin ones, though Target does not set a number.
Add the trust pages. An about page, a contact page, and a privacy policy tell a reviewer that a real person runs the site.
Your privacy policy has work to do here. Affiliate programs track sales with cookies, so mention that in plain words.
Make sure the site loads fast and works on a phone. Many readers shop from their phones, and a broken mobile layout hurts both your application and your future sales.
Add a disclosure that readers can actually see. A clear note placed next to your links beats one hidden at the bottom of the page.
Our page on legal disclosures explains how to word that note. Keep it plain, such as a line saying you may earn a commission when readers buy.
Check your domain name. Retail programs usually bar using the brand name inside your domain or email addresses, so a site called targetdealsdaily would be a problem.
Take a hard look at your layout too. A site cluttered with pop-ups, huge ads, or auto-playing video can feel spammy to a reviewer.
If you plan to write shopping content, draft a few posts where a Target product fits naturally. A gift guide or a room makeover gives a reviewer proof that you know how to recommend things.
Do not add Target links yet. Draft the posts and wait until the approval email arrives.
Look at your menu with fresh eyes. A reviewer should reach your best posts, your about page, and your contact page in a couple of clicks.
Proofread your top posts for typos and broken images. Small errors add up and make a site feel careless.
Keep your content original. Product descriptions copied from the store add nothing for a reader, so write your own notes from real use or real research.
Add your own photos when you can. A picture of a lamp in your living room does more for trust than a stock image from a catalog.
Step 3: Sign Up Through Impact
Now create your account on the network. Look for the Target Partners sign-up page, and avoid links from random emails.
Impact is the network behind the program, so your tracking, reports, and money all live in one dashboard. That is handy, because you only learn one system.
If you already have an Impact account from another brand, you can usually apply to Target from the same login. If you do not, you will build a new account first.
Use your real name and a business style email address when you can. A domain email looks more serious than a throwaway address.
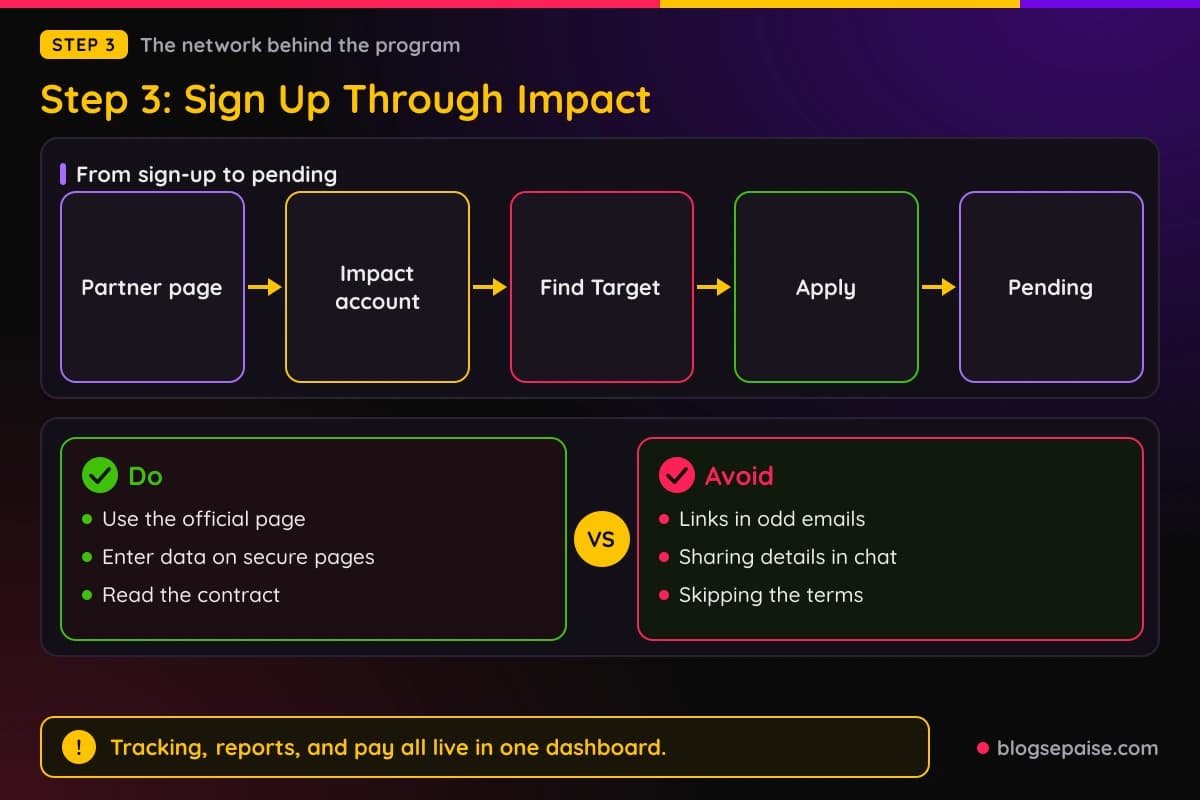
Choose the correct account type for how you earn. A blogger usually picks the type that fits a content site, and the choice affects the questions you see later.
Add your site details carefully. The address you enter should load a live site, with no errors and no redirect loop.
Impact will ask for tax and payment details at some point, because that is how it sends money. Enter those on the network's own secure pages only, never in an email or chat message.
Be wary of fake sign-up pages. Type the address yourself or use the button on Target's own partner page.
Once your account exists, look for Target in the network's directory. Open its page and read the contract terms listed there.
The contract on that page is the legal text you agree to when you apply. If something in it seems wrong for your site, stop before you click apply.
After you apply, the network shows your status as pending. Keep your inbox open, since decisions and follow-up questions come by email.
Take a screenshot of each screen as you go. If something breaks, you can show support exactly what you saw.
Do not rush through the terms screens. The boxes you tick are agreements, and you are bound by them once you apply.
Set up two step login on your network account if the option is offered. Your account holds payment and tax details, so protect it the way you protect your email.
Step 4: Fill Out The Application Carefully
The application itself is where many people rush. Expect questions about how you promote, where you promote, and who you are.
Published guides say you will give personal details, your website or social media information, and your promotional methods. Take your time with each one.
Describe your main promotion method first. For a blogger, that is usually content on a website, such as reviews and buying guides.
Name any secondary methods you really use. An email list or a Pinterest account counts only if you actually run it.
You will also name the countries where you promote. Choose the United States, since Target wants shoppers there.
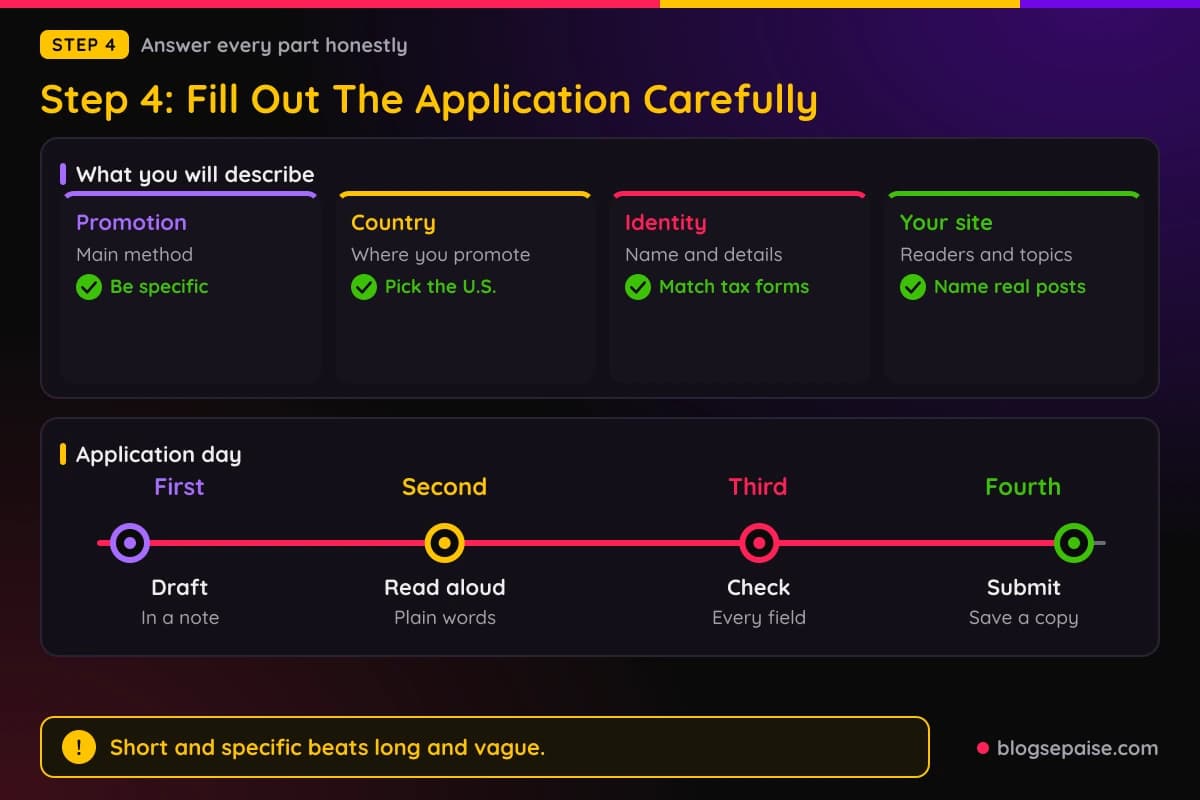
Company and personal details come next. Use your real legal name, and match it to the name on your payment and tax forms.
A mismatch between names can slow down a payment later. Fixing it before you apply is far easier than fixing it afterward.
Write a clear description of your site. Say who your readers are, what topics you cover, and how Target products fit into your posts.
Short and specific beats long and vague. A line like I write small apartment guides for renters and plan to link storage and decor reads well.
Name real example pages. If you already have a post where Target products would fit, point to it so the reviewer can see your plan.
Be honest about your traffic. Guides say small or new sites are less likely to be approved, but a made up number can end a good application.
Do not claim promotion methods you do not use. If you say you run an email list, a reviewer may ask to see it.
Double check every field before you submit. A typo in your site address can send the reviewer to a dead page.
Save a copy of your answers in a note on your computer. If you have to reapply, you will have a head start.
Read your site description out loud before you send it. If it sounds like an ad, rewrite it in plain words, the way you would explain your blog to a friend.
Do not copy answers from a forum post or a template. Reviewers read many applications, and canned text stands out for the wrong reasons.
Give a working contact email and check it daily. A follow-up question can land in a spam folder, and a missed reply can sink a good application.
Step 5: Avoid The Common Rejection Causes
Target does not publish a list of rejection reasons. Applications are reviewed by hand, and the program can decline any of them.
Even so, the usual retail rules point to the likely causes. Fixing each one before you apply improves your odds.
The first cause is a site that is thin or unfinished. A blog with three posts and a placeholder about page looks like a hobby that is not ready.
The second cause is the wrong audience. Guides say Target credits only U.S. visitors, so a site aimed at readers elsewhere does not fit.
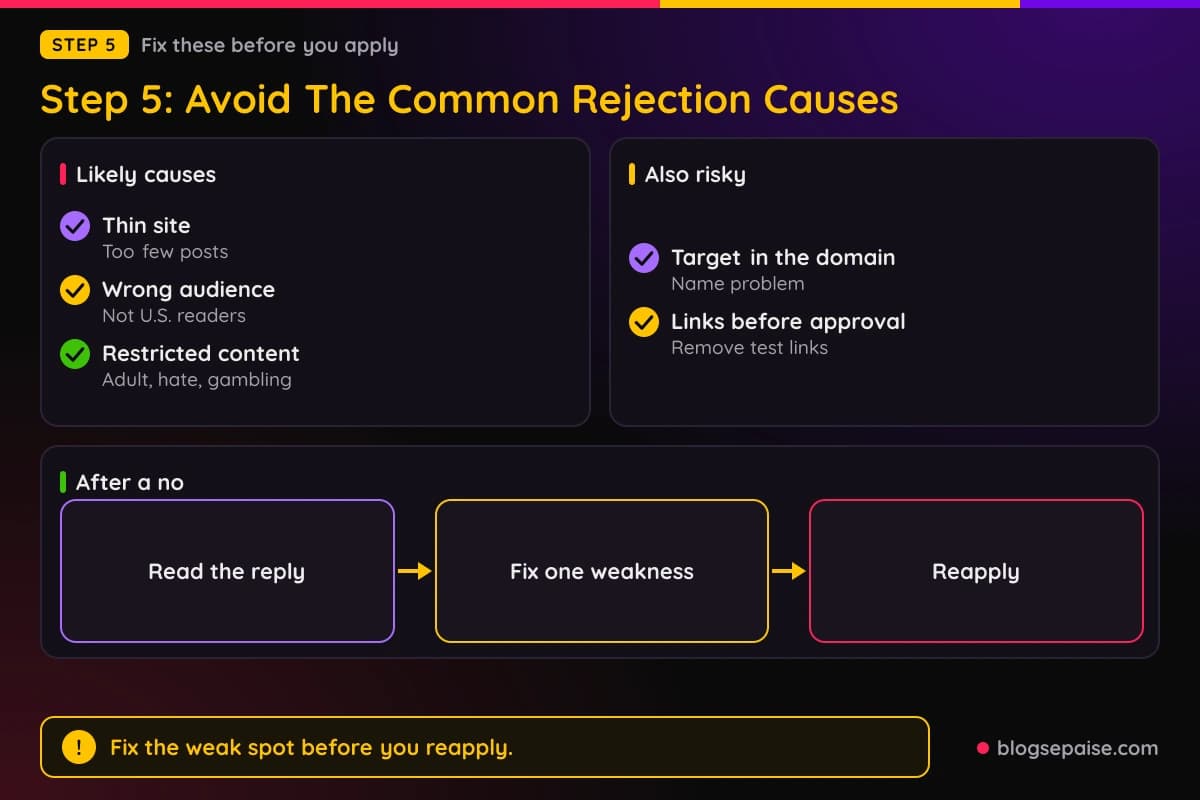
The third cause is restricted content. Adult material, hate, gambling, and illegal topics all fall outside what a family friendly retailer wants.
The fourth cause is a name problem. Using Target's name or logo in your domain or email address is a common reason for a no, so rename the project before you apply.
The fifth cause is early linking. Remove any test links from drafts, because linking before approval can count against you.
The sixth cause is a promotion plan that breaks the rules. Published guides say Target bars bidding on its brand name in paid search, and most retail programs also bar spam email.
The seventh cause is a coupon or incentive style site. Many retail programs limit coupon sites and reward schemes, so read the terms before you assume your model is welcome.
Cashback and loyalty sites get extra scrutiny at most retailers. If you give members points or cash for clicking your links, expect questions.
Thin or copied content can hurt too. Reviewers see a lot of sites, and a page stuffed with product grids tells them little.
If you get a no, you can usually try again. Use the wait to fix what looks weak, and do not send the same application twice.
Read any reply from the network for clues. Our guide on how to avoid getting banned from affiliate programs shows how to stay on the right side of program rules after you are in.
When you reapply, change something real. Add posts, clean up the layout, and fix any issue that you can name before you send a second application.
Run a final check the night before you apply. Open your site on a phone, click every menu item, and read your disclosure once more.
Ask a friend to look at the site for two minutes and tell you what it is about. If they cannot say, a reviewer probably cannot either.
Keep a short log of each application date and result. Over time the log shows you what changed between a no and a yes.
Step 6: Know The Commission Rates And Cookie Window
Before you plan content, learn how Target pays. The rate depends on the category of the product, and the range is wide.
Published guides list Home and Outdoor Living at 5% to 8%. Apparel and accessories sit at 5%, and baby gear and furniture sit at 5% as well.
Health and beauty pays 1%, and video games pay 1%. Those two are easy to ignore when you plan your posts.
Several categories pay 0%. Groceries and food, electronics and TVs, toys, pet care, sporting goods, books, movies, music, and pharmacy all show up on that list.
The top rate of 8% is said to go to high volume sellers in qualifying categories. Guides add that most affiliates earn between 1% and 5%.
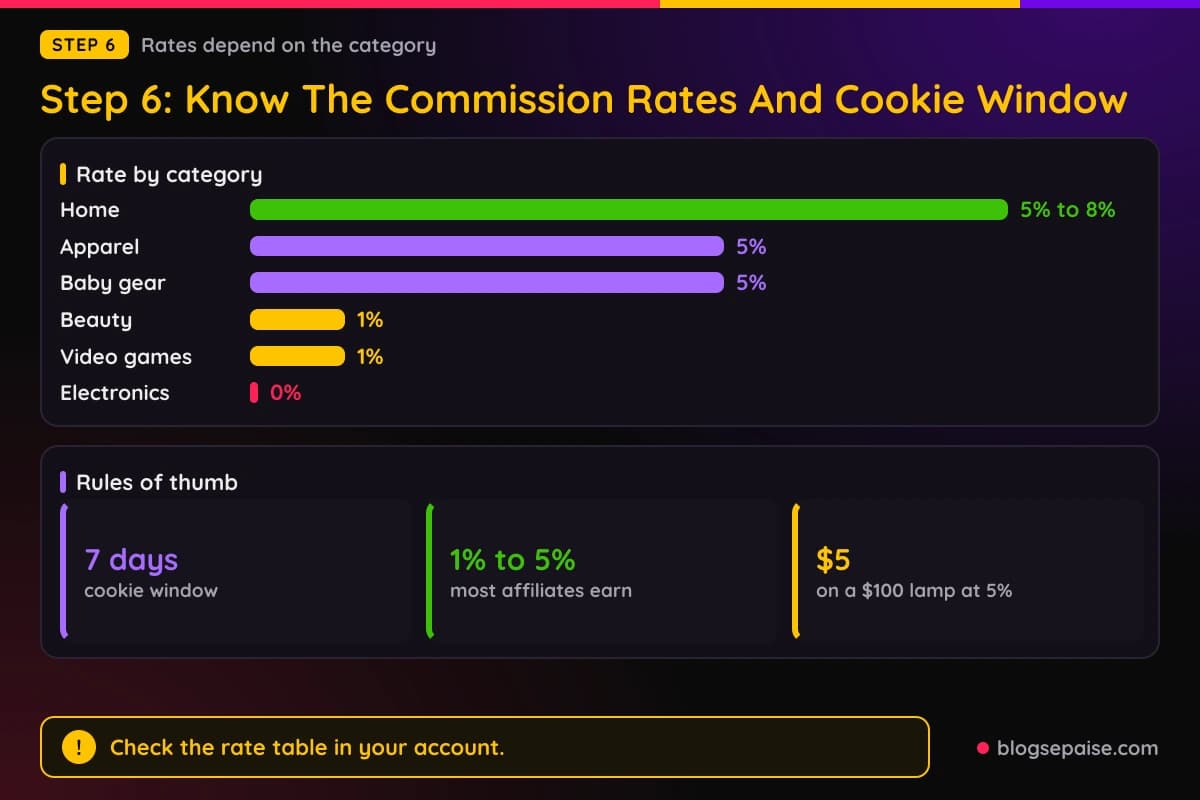
Those numbers come from third party guides, and they may have changed. Check the rate table inside your Impact account before you build a plan on them.
The cookie window matters just as much. Guides report 7 days, which means you earn on a purchase made within a week of the click.
A purchase in that window earns commission on the whole qualifying order, even items you never linked. If a reader clicks a lamp and buys a rug, the rug can pay too.
A 7 day window is short, so your best posts are the ones that push readers to buy soon. Gift lists, sale season roundups, and room makeovers fit well.
Compare that with a monthly software program. A reader who clicks today and buys in three weeks will not pay you here.
Do the math on a sample sale. A $100 lamp at a 5% rate pays $5, while a $100 gadget in electronics pays nothing.
Notice how the zero categories change your plan. A tech blog may struggle at Target, while a home or parenting blog fits much better.
Look at your own traffic and match it to the paying categories. A few well placed home decor links can beat dozens of toy links.
Your account shows the live rates for each category, and those can differ from any guide. Always trust the dashboard over a blog post, including this one.
Step 7: Get Your Links And Start Promoting
The approval email is the starting gun. Log in to the network and open the Target program page, where link tools are waiting.
Guides say approved members get banners, creative assets, and deep links to almost any product. Use the link generator for simple text links first.
Link only to products that fit your content. A link makes sense when the product is clearly featured on the page.
Use the official links from the dashboard. Hand built links can break tracking, and broken tracking means missing pay.
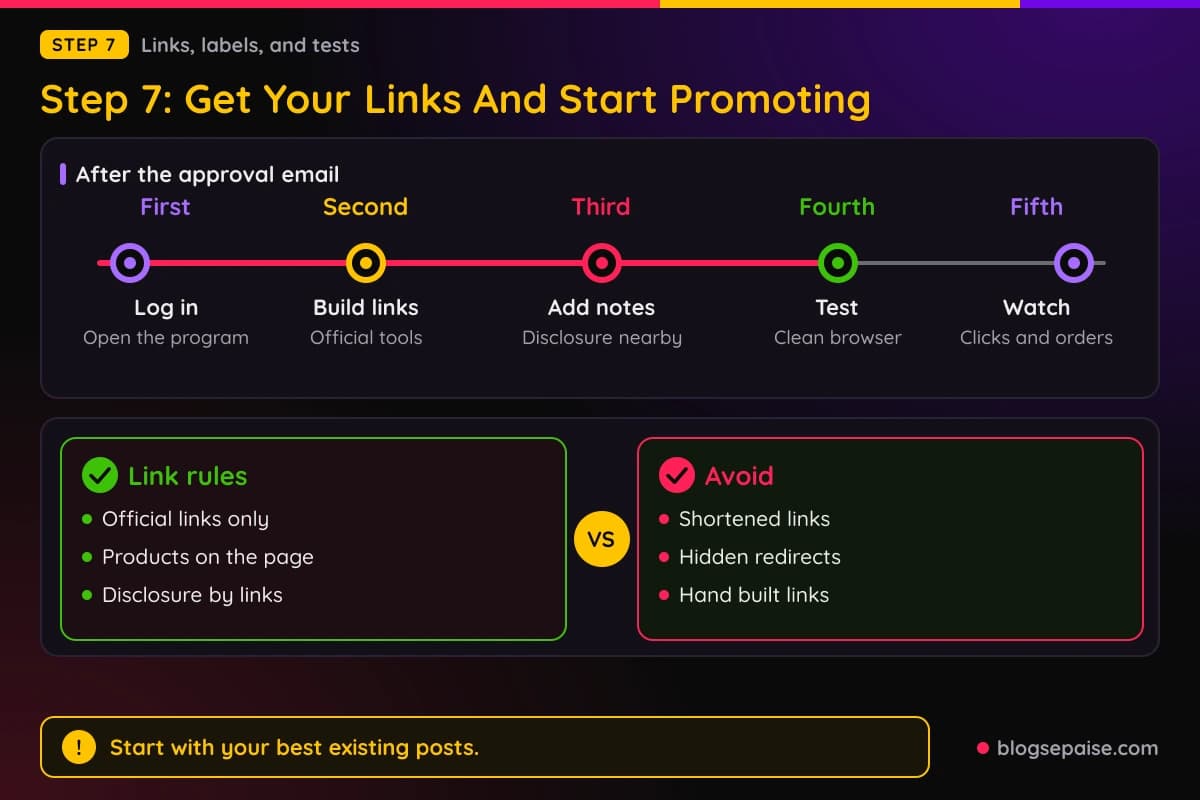
Skip tricks that hide the real address. Retail programs usually frown on shortened or cloaked links that hide the destination.
Place the disclosure next to every group of links. A short line above a list of products works better than a note at the bottom of the page.
Your reviews have to be honest. Say what you like, say what you do not, and write from real use or real research.
Start with your best existing posts. A link inside a post that already gets visitors teaches you more than a link in a brand new post.
Our guide on how to find affiliate links walks through pulling links from a network dashboard. The steps look similar across many programs.
If your site is also waiting on an ad network, read how to use affiliate links before AdSense approval for ideas on making use of links in the meantime.
Test every link in a clean browser window. Confirm that it lands on the right Target page and that your dashboard records the click.
Remember that the buyer needs cookies enabled for a sale to count. You cannot control that, so do not be surprised when a few clicks never show up as sales.
Plan your first month before you place a single link. Pick five posts, pick two or three products for each, and decide where the disclosure will go.
Write about products you would actually recommend. Readers can tell when a link was added only for a commission, and trust is worth more than one sale.
Update old posts with fresh links too. Many of your best opportunities sit in older articles that already rank and bring steady visitors.
Step 8: Track Payments And Keep Your Account Safe
Approval is the start of a long relationship. Now you need to watch your numbers and follow the rules every day.
Open your network reports each week. Look at clicks, orders, and commissions, and compare them with the posts that sent the traffic.
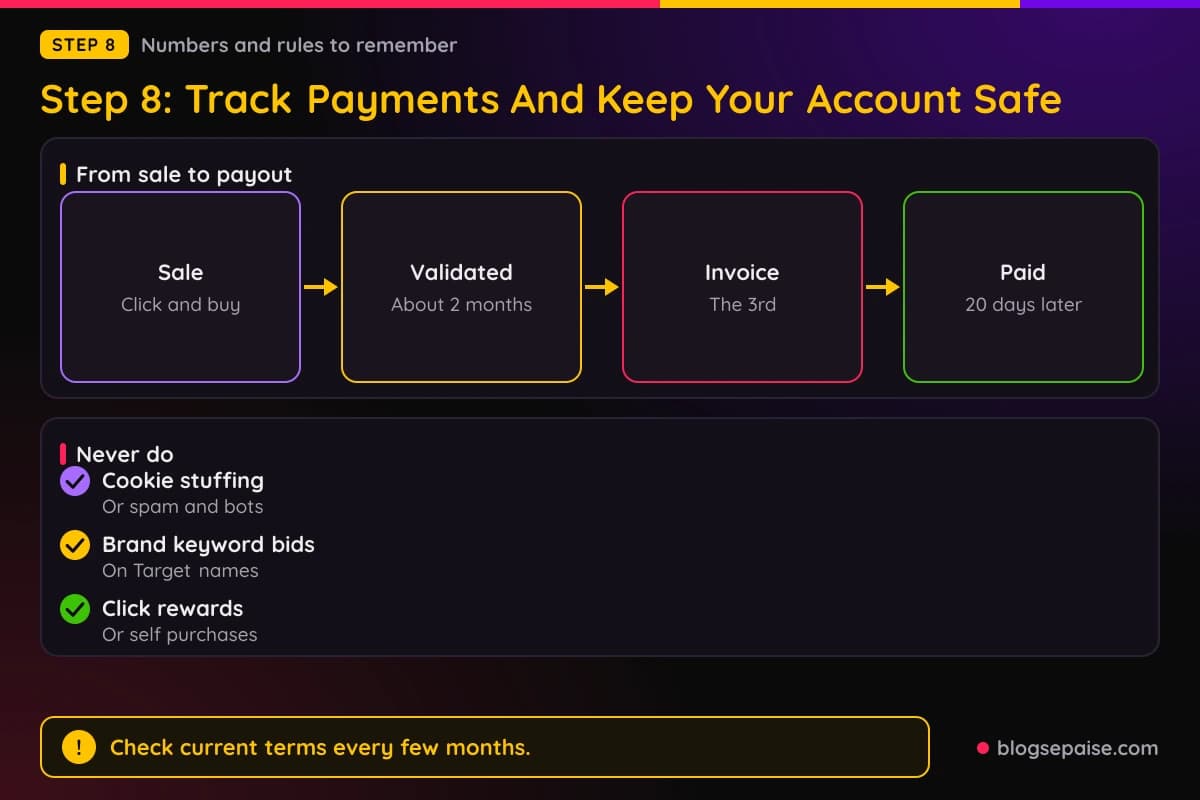
Payments arrive slowly. Guides say sales are validated about 2 months after the transaction, and invoices are generated on the 3rd of each month.
Payment lands 20 days after the invoice. In practice, a sale can take 2 to 3 months to turn into money in your account.
Returns and cancelled orders do not pay. If a customer sends an item back, the commission can be reversed.
Guides disagree on the payout threshold, with figures of $10 in one place and $50 in another. Check the payment settings in your network account for the current number.
Pay attention to the rules on promotion. Bidding on Target's brand name in paid search is barred, so skip paid search on the brand entirely.
Never offer rewards for clicking or buying through your links. Giveaways that depend on using your affiliate link can break the terms.
Never cookie stuff, spam, or use bots. Those tricks get accounts removed fast, and the withheld commissions rarely come back.
Do not buy through your own links to earn a rebate. Self purchases are a classic reason for a reversal at most programs.
If you use AI to help write posts, check every fact. A wrong price or a wrong product detail hurts your readers and your trust.
Either side can end the relationship at any time. Violations can lead to removal, so keep your habits clean.
Taxes are your job. Keep records of what the network pays you, and ask a tax professional about your situation.
Give each test about four weeks before you judge it. A slow week on a small site proves nothing.
Move your effort toward the posts that earn. If a home decor guide brings orders and a news post brings none, write more guides.
Review the terms again every few months. Rules, rates, and excluded items can shift, and a quick check keeps you from breaking a rule you never saw change.
A Worked Example: Dana Applies With A Home Decor Blog
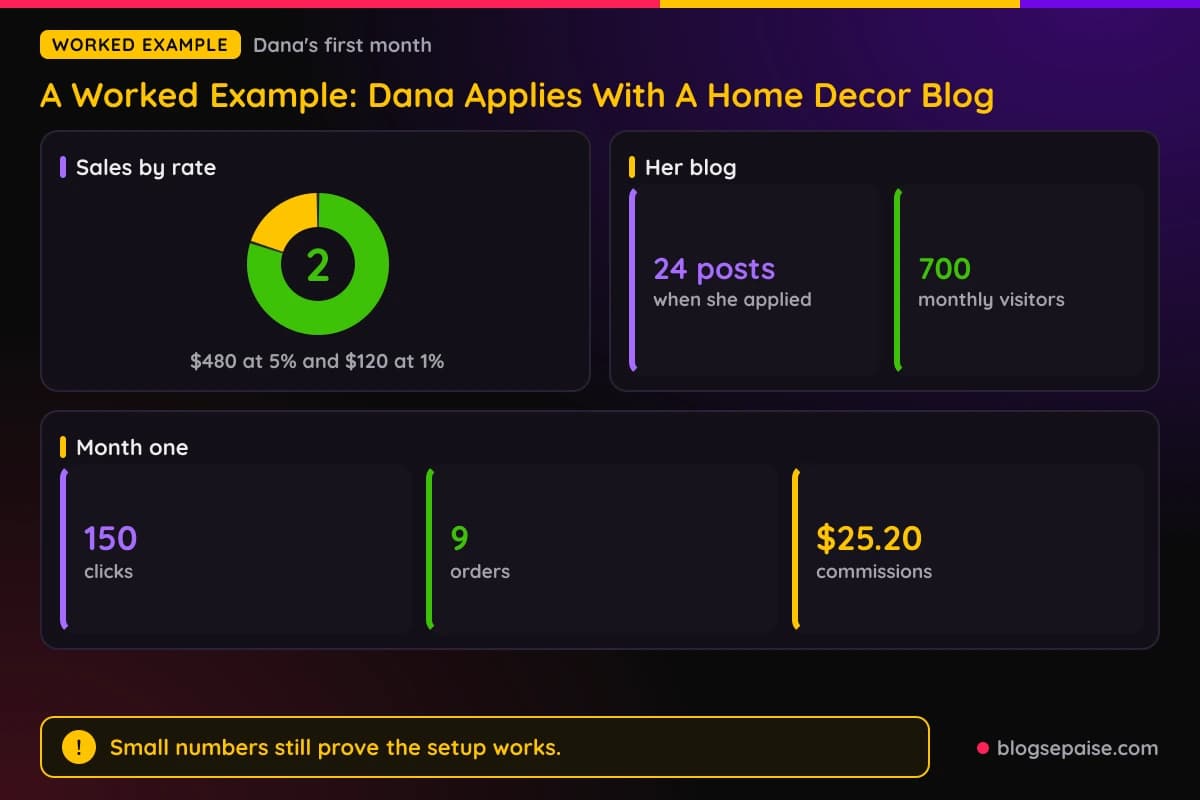
Dana runs a blog about small apartment decor for renters. She has 24 posts, an about page, a contact page, and a privacy policy that mentions cookies.
All the numbers in this example are made up so you can follow the method. They are not a promise of what your site will earn.
In week one, Dana reads the Target program terms start to finish. She notes that her site is aimed at U.S. readers and that she is over 18.
She also renames her draft social handle, which had Target in it. She fixes it before she applies.
Dana removes two test links she had placed in a draft. She remembers that linking before approval can hurt her chances.
In week two she creates her Impact account and fills out the Target application. She describes her blog, names two posts where decor products fit, and chooses the United States as her country.
The network shows her status as pending. A few days later an approval email arrives.
On day four she opens the dashboard and builds links for ten decor items. She adds a plain note above each product list that says she may earn a commission.
She places the links in her five best posts, which together bring about 700 visitors a month. She tests each link in a clean browser.
By the end of month one she has 150 clicks and 9 orders. Her qualifying sales come to $480 in home decor at a 5% rate and $120 in health and beauty at a 1% rate.
That works out to $24.00 plus $1.20, or $25.20 in commissions. The amount is small, but the dashboard proves her tracking works.
Because payment comes 2 to 3 months after a sale, Dana does not see the money for a while. She treats the first quarter as a test and keeps writing.
She also notices that no reader bought from a zero percent category. That tells her to stop adding electronics links and focus on decor.
In month two she moves her links higher in the posts and adds a buying guide for rental friendly storage. Clicks climb as the posts get more traffic.
Her lesson is not the $25.20. She followed the rules, kept her disclosures clear, and used real numbers to decide where to add links next.
Notice what she did not do. She did not buy through her own links, she did not run paid ads on the brand, and she did not promise readers anything the products could not deliver.
Her made up numbers also show a common shape. Clicks come first, orders come next, and the money shows up much later.
If Dana had been rejected, her plan would have been simple. She would have read the reply, fixed the weakest part of her site, and reapplied.
Common Mistakes With The Target Affiliate Program
Most mistakes come from rushing or from skipping the terms. Each one below can cost you an approval or an account.
The first mistake is linking before approval. Wait for the email before you place a single Target link.
The second mistake is putting Target in your domain or email address. A rename after launch costs far more than a rename before.
The third mistake is skipping the disclosure. Readers deserve to know that you may earn a commission, and the law expects it too.
The fourth mistake is hiding the link. Cloaked or shortened links that obscure the destination can break the link rules.
The fifth mistake is bidding on Target's name in paid search. Guides say trademark bidding is barred, and the penalty can be removal.
The sixth mistake is writing about zero percent categories. A post full of toys and electronics can bring clicks and no pay.
The seventh mistake is aiming at the wrong audience. A site written mainly for readers outside the United States does not fit the program.
The eighth mistake is trusting an old guide. Rates, cookie windows, and payout rules change, and a post from last year may be wrong today.
The ninth mistake is treating the program as a quick payday. Low rates and slow payments mean you need steady traffic and patience.
The tenth mistake is giving up after one rejection. Fix the weak spots and try again.
The last mistake is ignoring your reports. A link that gets clicks and no sales tells you something, and you only learn it if you look.
A good habit fixes most of these. Before you click apply or publish a link, ask yourself which rule it touches and where you can read it.
If you cannot find the answer in a couple of minutes, ask support. Network teams would rather answer a question than clean up a mistake.
Final Thoughts
Getting into the Target affiliate program is mostly about preparation. A live site, a U.S. audience, clean content, a clear disclosure, and an honest application cover most of what a reviewer wants.
Remember the quirks. Apply through Impact, do not link before you are approved, aim at the categories that pay, and expect slow payments.
Rates, cookie windows, and payout rules can change. Check the current terms in your network account before you plan your income around them.
If you get a no, treat it as a to-do list. Fix what looks weak and reapply.
Start with step one today and read the terms. When you are ready to keep your account safe long term, read our page on how to avoid getting banned from affiliate programs.
Frequently Asked Questions
1. How do I get approved for the Target affiliate program?
Sign up through the Impact network, apply to the Target program, and describe your live site honestly. Reviewers check each application by hand, so approval is never guaranteed.
2. Which network does the Target affiliate program use?
It runs on Impact. Start from the Target Partners sign-up page and avoid links in unexpected emails.
3. How long does approval take?
Timing varies and Target does not promise a date. Wait for the decision email before you add any links.
4. Do I need a website to join?
The program is built for bloggers, website owners, and content creators. A finished site with real posts gives you the best chance.
5. Is there a minimum traffic requirement?
No minimum is published. Guides say small or brand new sites are less likely to get approved.
6. Can I join from outside the United States?
Guides say only sales from U.S. visitors are credited. A site aimed at U.S. shoppers fits best.
7. How old do I have to be?
You must be of legal age where you live, which is at least 18 in most states. Check the network terms for the exact rule.
8. How much does the Target affiliate program pay?
Published guides report rates from 1% to 8%, depending on the category. Most affiliates earn between 1% and 5%.
9. How long is the cookie window?
Guides report 7 days. Confirm the current number in the program details before you plan around it.
10. Which categories pay nothing?
Guides list groceries, electronics, toys, pet care, sporting goods, books, movies, music, and pharmacy at 0%. Check your dashboard for the current list.
11. When does Target pay affiliates?
Guides say invoices are generated on the 3rd of each month and paid 20 days later. A sale can take 2 to 3 months to reach you.
12. Why was my application rejected?
Target does not publish reasons. Common causes include a thin site, the wrong audience, restricted content, and linking before approval.
13. Can I reapply after a rejection?
Usually yes, but fix the weak spots first. Add posts and clean up your site before you send a new application.
14. Do I need a disclosure?
Yes. A clear note next to your links is the safe move, and the law expects honest disclosure too.
15. Can I run paid ads on Target's name?
No. Guides say bidding on Target's brand name in paid search is barred.
16. Is Club Target the same program?
No. Club Target is a separate, points based program for social creators, so read its own rules if you plan to join it.
17. Can I put Target in my domain name?
Avoid it. Retail programs usually bar using the brand name in a domain, subdomain, or email address.